
Caffe 實現多標籤分類 支援Multi-Label的LMDB資料格式輸入
Caffe自帶的影象轉LMDB介面只支援單label,對於多label的任務,可以使用HDF5的格式,也可以通過修改caffe程式碼來實現, 我的文章Caffe 實現多標籤分類 裡介紹了怎麼通過修改ImageDataLayer來實現Multilabel的任務, 本篇文章介紹怎麼通過修改DataLayer來實現帶Multilabel的LMDB格式資料輸入的分類任務
1. 首先修改程式碼
修改下面的幾個檔案:
$CAFFE_ROOT/src/caffe/proto/caffe.proto
$CAFFE_ROOT/src/caffe/layers/data_layer.cpp
$CAFFE_ROOT/src/caffe/util/io.cpp
$CAFFE_ROOT/include/caffe/util/io.hpp
$CAFFE_ROOT/tools/convert_imageset.cpp
(1) 修改 caffe.proto
在 message Datum { }裡新增用於容納labels的一項
repeated float labels = 8;

如果你的Label只有int型別,可以用 repeated int32 labels = 8;
(2) 修改 data_layer.cpp
修改函式 DataLayerSetUp()
新的程式碼:
vector<int> label_shape(2);
label_shape[0] = batch_size;
label_shape[1] = datum.labels_size();
修改函式 load_batch()
新的程式碼:
int labelSize = datum.labels_size();
for(int i = 0; i < labelSize; i++){
     top_label[item_id*labelSize + i] = datum.labels(i);
}
程式碼修改前後,右邊是修改後的程式碼

(3) 修改 io.hpp
新的程式碼
bool ReadFileToDatum(const string& filename, const vector<float> label, Datum* datum);

inline bool ReadFileToDatum(const string& filename, Datum* datum) {
  return ReadFileToDatum(filename, vector<float>(), datum);
}

bool ReadImageToDatum(const string& filename, const vector<float> label,
    const int height, const int width, const bool is_color,
    const std::string & encoding, Datum* datum);

inline bool ReadImageToDatum(const string& filename, const vector<float> label,
    const int height, const int width, const bool is_color, Datum* datum) {
  return ReadImageToDatum(filename, label, height, width, is_color,
                          "", datum);
}

inline bool ReadImageToDatum(const string& filename, const vector<float> label,
    const int height, const int width, Datum* datum) {
  return ReadImageToDatum(filename, label, height, width, true, datum);
}

inline bool ReadImageToDatum(const string& filename, const vector<float> label,
    const bool is_color, Datum* datum) {
  return ReadImageToDatum(filename, label, 0, 0, is_color, datum);
}

inline bool ReadImageToDatum(const string& filename, const vector<float> label,
    Datum* datum) {
  return ReadImageToDatum(filename, label, 0, 0, true, datum);
}

inline bool ReadImageToDatum(const string& filename, const vector<float> label,
    const std::string & encoding, Datum* datum) {
  return ReadImageToDatum(filename, label, 0, 0, true, encoding, datum);
}
程式碼修改前後,右邊是修改後的程式碼

(4) 修改 io.cpp
修改函式 ReadImageToDatum()
修改後的程式碼
bool ReadImageToDatum(const string& filename, const vector<float> label,
    const int height, const int width, const bool is_color,
    const std::string & encoding, Datum* datum) {
  cv::Mat cv_img = ReadImageToCVMat(filename, height, width, is_color);
  if (cv_img.data) {
    if (encoding.size()) {
      if ( (cv_img.channels() == 3) == is_color && !height && !width &&
          matchExt(filename, encoding) )
        return ReadFileToDatum(filename, label, datum);
      std::vector<uchar> buf;
      cv::imencode("."+encoding, cv_img, buf);
      datum->set_data(std::string(reinterpret_cast<char*>(&buf[0]),
                      buf.size()));

      datum->clear_labels();
      for (int i = 0; i < label.size(); i++){
         datum->add_labels(label[i]);
      }
      datum->set_encoded(true);
      return true;
    }
    CVMatToDatum(cv_img, datum);

    datum->clear_labels();
    for (int i = 0; i < label.size(); i++){
       datum->add_labels(label[i]);
    }
    return true;
  } else {
    return false;
  }
}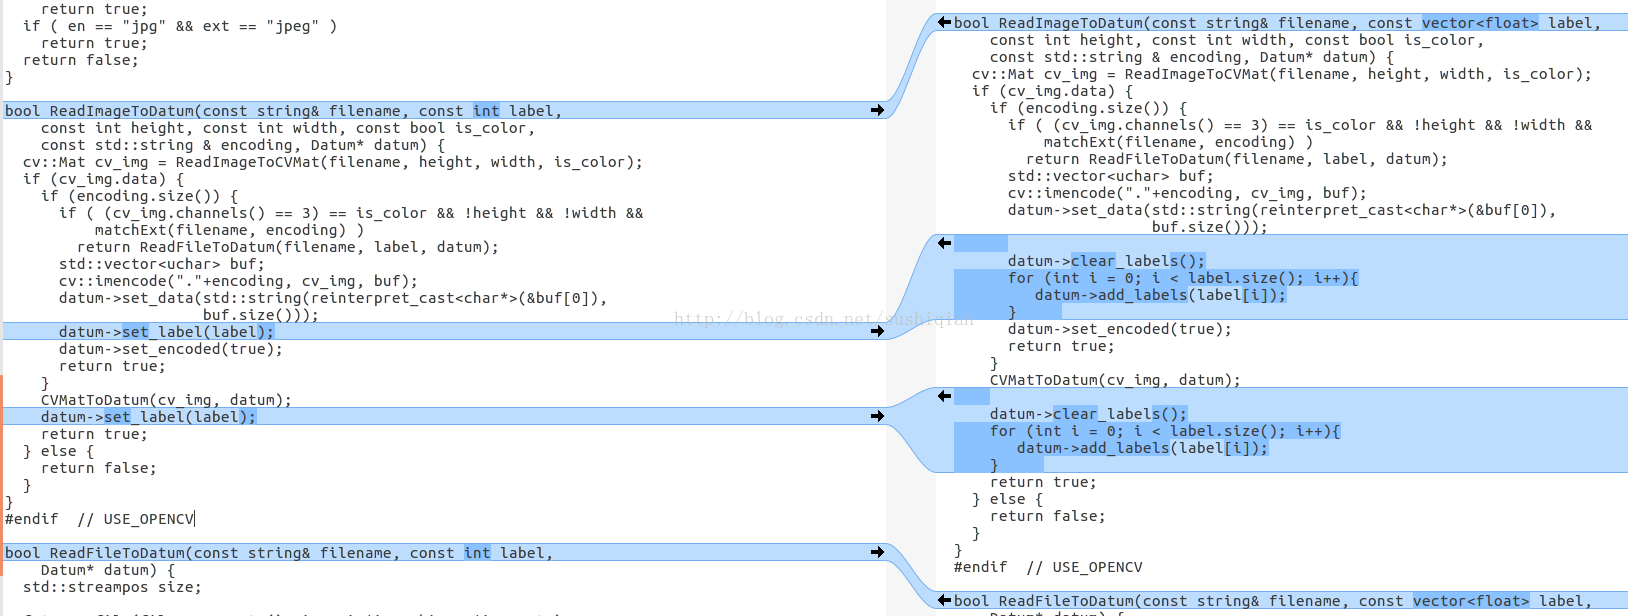
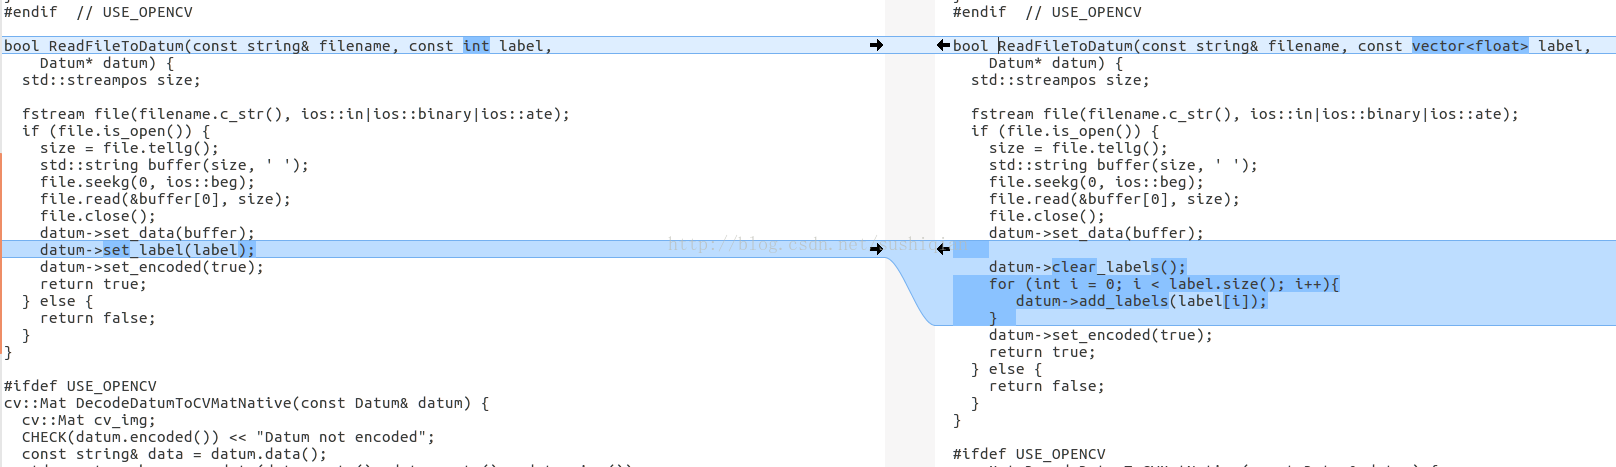
修改函式 ReadFileToDatum()
修改後的程式碼
bool ReadFileToDatum(const string& filename, const vector<float> label,
    Datum* datum) {
  std::streampos size;

  fstream file(filename.c_str(), ios::in|ios::binary|ios::ate);
  if (file.is_open()) {
    size = file.tellg();
    std::string buffer(size, ' ');
    file.seekg(0, ios::beg);
    file.read(&buffer[0], size);
    file.close();
    datum->set_data(buffer);

    datum->clear_labels();
    for (int i = 0; i < label.size(); i++){
       datum->add_labels(label[i]);
    }
    datum->set_encoded(true);
    return true;
  } else {
    return false;
  }
}
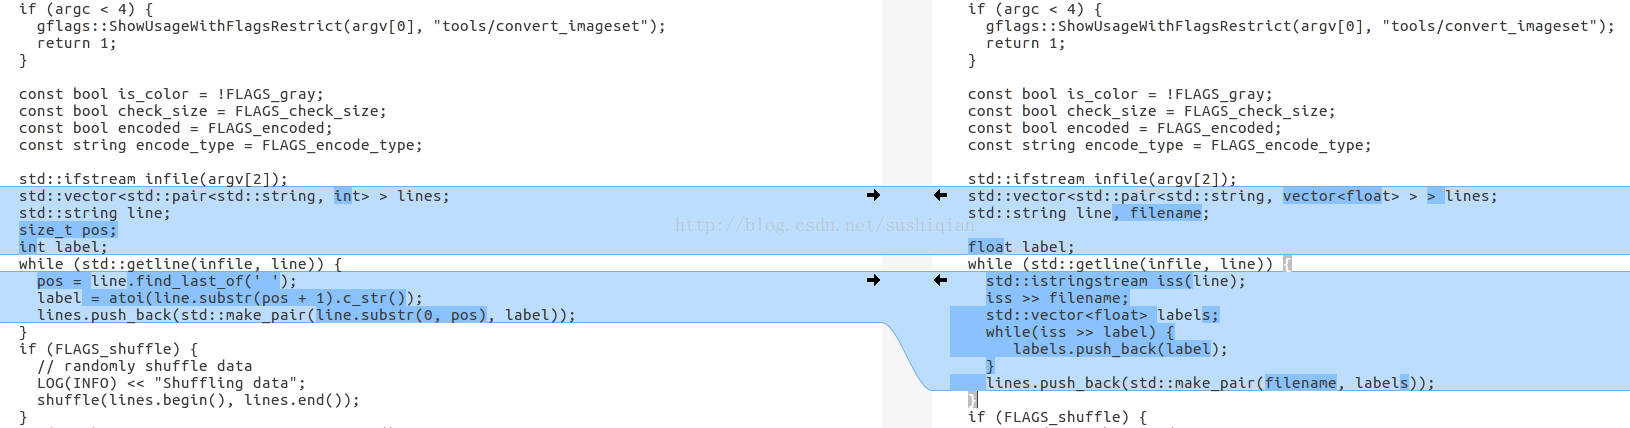
(5) 修改 convert_imageset.cpp
修改部分新的程式碼
std::vector<std::pair<std::string, vector<float> > > lines;
  std::string line, filename;

  float label;
  while (std::getline(infile, line)) {
    std::istringstream iss(line);
    iss >> filename;
    std::vector<float> labels;
    while(iss >> label) {
       labels.push_back(label);
    }
    lines.push_back(std::make_pair(filename, labels));
  }
2. 編譯程式碼
[email protected]:~/caffe/build$ make all
[email protected]:~/caffe/build$ sudo make install
3. 生成LMDB檔案
編譯成功後,使用新生成的 convert_imageset 將訓練所用的圖片轉換成LMDB檔案
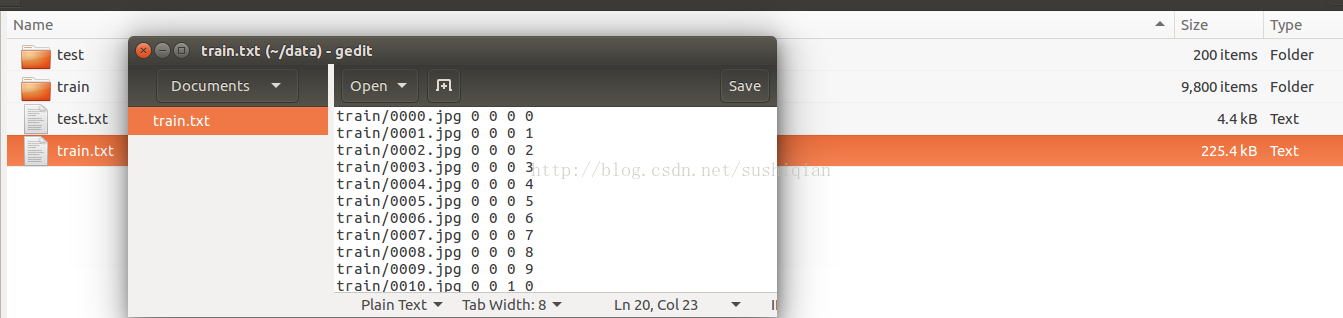
將訓練所用圖片轉換為LMDB檔案
[email protected]:~/caffe$ sudo ./build/tools/convert_imageset -shuffle=true
/home/mark/data/ /home/mark/data/train.txt
./examples/captcha/captcha_train_lmdb
/home/mark/data/ 是訓練所用的圖片所在的root目錄
/home/mark/data/train.txt 記錄每個訓練圖片檔案的名稱和標籤,它的內容見下圖,訓練圖片檔案的名稱和/home/mark/data/拼接起來是訓練圖片的絕對路徑
./examples/captcha/captcha_train_lmdb 是生成的lmdb檔案所在目錄
同樣可以將測試圖片轉換成LMDB檔案
[email protected]:~/caffe$ sudo ./build/tools/convert_imageset -shuffle=true /home/mark/data/ /home/mark/data/test.txt ./examples/captcha/captcha_test_lmdb
4. 網路結構和solver
網路結構檔案 captcha_train_test_lmdb.prototxt
name: "captcha"
layer {
  name: "Input"
  type: "Data"
  top: "data"
  top: "label"
  include {
    phase: TRAIN
  }
  transform_param {
    scale: 0.00390625
  }
  data_param {
    source: "examples/captcha/captcha_train_lmdb"
    batch_size: 50
    backend: LMDB
  }
}

layer {
  name: "Input"
  type: "Data"
  top: "data"
  top: "label"
  include {
    phase: TEST
  }
  transform_param {
    scale: 0.00390625
  }
  data_param {
    source: "examples/captcha/captcha_test_lmdb"
    batch_size: 20
    backend: LMDB
  }
}

layer {
  name: "slice"
  type: "Slice"
  bottom: "label"
  top: "label_1"
  top: "label_2"
  top: "label_3"
  top: "label_4"
  slice_param {
    axis: 1
    slice_point:1
    slice_point:2
    slice_point:3
  }
}

layer {
  name: "conv1"
  type: "Convolution"
  bottom: "data"
  top: "conv1"
  param {
    lr_mult: 1
  }
  param {
    lr_mult: 2
  }
  convolution_param {
    num_output: 20
    kernel_size: 5
    stride: 1
    weight_filler {
      type: "xavier"
    }
    bias_filler {
      type: "constant"
    }
  }
}
layer {
  name: "pool1"
  type: "Pooling"
  bottom: "conv1"
  top: "pool1"
  pooling_param {
    pool: MAX
    kernel_size: 2
    stride: 2
  }
}
layer {
  name: "conv2"
  type: "Convolution"
  bottom: "pool1"
  top: "conv2"
  param {
    lr_mult: 1
  }
  param {
    lr_mult: 2
  }
  convolution_param {
    num_output: 50
    kernel_size: 5
    stride: 1
    weight_filler {
      type: "xavier"
    }
    bias_filler {
      type: "constant"
    }
  }
}
layer {
  name: "pool2"
  type: "Pooling"
  bottom: "conv2"
  top: "pool2"
  pooling_param {
    pool: MAX
    kernel_size: 2
    stride: 2
  }
}
layer {
  name: "ip1"
  type: "InnerProduct"
  bottom: "pool2"
  top: "ip1"
  param {
    lr_mult: 1
  }
  param {
    lr_mult: 2
  }
  inner_product_param {
    num_output: 500
    weight_filler {
      type: "xavier"
    }
    bias_filler {
      type: "constant"
    }
  }
}
layer {
  name: "relu1"
  type: "ReLU"
  bottom: "ip1"
  top: "ip1"
}

layer {
  name: "ip2"
  type: "InnerProduct"
  bottom: "ip1"
  top: "ip2"
  param {
    lr_mult: 1
  }
  param {
    lr_mult: 2
  }
  inner_product_param {
    num_output: 100
    weight_filler {
      type: "xavier"
    }
    bias_filler {
      type: "constant"
    }
  }
}

layer {
  name: "ip3_1"
  type: "InnerProduct"
  bottom: "ip2"
  top: "ip3_1"
  param {
    lr_mult: 1
  }
  param {
    lr_mult: 2
  }
  inner_product_param {
    num_output: 10
    weight_filler {
      type: "xavier"
    }
    bias_filler {
      type: "constant"
    }
  }
}

layer {
  name: "ip3_2"
  type: "InnerProduct"
  bottom: "ip2"
  top: "ip3_2"
  param {
    lr_mult: 1
  }
  param {
    lr_mult: 2
  }
  inner_product_param {
    num_output: 10
    weight_filler {
      type: "xavier"
    }
    bias_filler {
      type: "constant"
    }
  }
}

layer {
  name: "ip3_3"
  type: "InnerProduct"
  bottom: "ip2"
  top: "ip3_3"
  param {
    lr_mult: 1
  }
  param {
    lr_mult: 2
  }
  inner_product_param {
    num_output: 10
    weight_filler {
      type: "xavier"
    }
    bias_filler {
      type: "constant"
    }
  }
}

layer {
  name: "ip3_4"
  type: "InnerProduct"
  bottom: "ip2"
  top: "ip3_4"
  param {
    lr_mult: 1
  }
  param {
    lr_mult: 2
  }
  inner_product_param {
    num_output: 10
    weight_filler {
      type: "xavier"
    }
    bias_filler {
      type: "constant"
    }
  }
}

layer {
  name: "accuracy1"
  type: "Accuracy"
  bottom: "ip3_1"
  bottom: "label_1"
  top: "accuracy1"
  include {
    phase: TEST
  }
}
layer {
  name: "loss1"
  type: "SoftmaxWithLoss"
  bottom: "ip3_1"
  bottom: "label_1"
  top: "loss1"
}

layer {
  name: "accuracy2"
  type: "Accuracy"
  bottom: "ip3_2"
  bottom: "label_2"
  top: "accuracy2"
  include {
    phase: TEST
  }
}
layer {
  name: "loss2"
  type: "SoftmaxWithLoss"
  bottom: "ip3_2"
  bottom: "label_2"
  top: "loss2"
}

layer {
  name: "accuracy3"
  type: "Accuracy"
  bottom: "ip3_3"
  bottom: "label_3"
  top: "accuracy3"
  include {
    phase: TEST
  }
}
layer {
  name: "loss3"
  type: "SoftmaxWithLoss"
  bottom: "ip3_3"
  bottom: "label_3"
  top: "loss3"
}

layer {
  name: "accuracy4"
  type: "Accuracy"
  bottom: "ip3_4"
  bottom: "label_4"
  top: "accuracy4"
  include {
    phase: TEST
  }
}
layer {
  name: "loss4"
  type: "SoftmaxWithLoss"
  bottom: "ip3_4"
  bottom: "label_4"
  top: "loss4"
}# The train/test net protocol buffer definition
net: "examples/captcha/captcha_train_test_lmdb.prototxt"
# test_iter specifies how many forward passes the test should carry out.
# covering the full 9,800 testing images.
test_iter: 200
# Carry out testing every 200 training iterations.
test_interval: 200
# The base learning rate, momentum and the weight decay of the network.
base_lr: 0.001
momentum: 0.9
weight_decay: 0.0005
# The learning rate policy
lr_policy: "inv"
gamma: 0.0001
power: 0.75
# Display every 100 iterations
display: 100
# The maximum number of iterations
max_iter: 10000
# snapshot intermediate results
snapshot: 5000
snapshot_prefix: "examples/captcha/captcha"
# solver mode: CPU or GPU
solver_mode: GPU5. 開始訓練
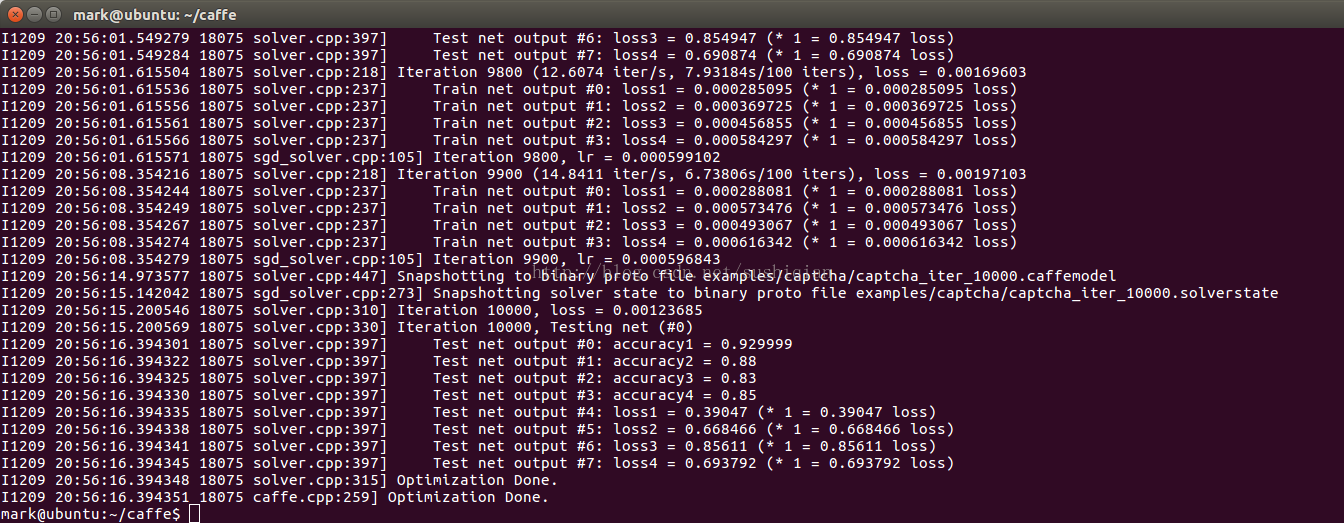
[email protected]:~/caffe$ sudo ./build/tools/caffe train --solver=examples/captcha/captcha_solver_lmdb.prototxt
訓練完後,生成model檔案: captcha_iter_10000.caffemodel
6. 用生成的model 檔案進行測試
首先,需要一個deploy.prototxt檔案,在captcha_train_test_lmdb.prototxt的基礎上修改,修改後儲存為 captcha_deploy_lmdb.prototxt 內容如下
name: "captcha"

input: "data"
input_dim: 1   # batchsize
input_dim: 3   # number of channels - rgb
input_dim: 60  # height
input_dim: 160 # width

layer {
  name: "conv1"
  type: "Convolution"
  bottom: "data"
  top: "conv1"
  param {
    lr_mult: 1
  }
  param {
    lr_mult: 2
  }
  convolution_param {
    num_output: 20
    kernel_size: 5
    stride: 1
    weight_filler {
      type: "xavier"
    }
    bias_filler {
      type: "constant"
    }
  }
}
layer {
  name: "pool1"
  type: "Pooling"
  bottom: "conv1"
  top: "pool1"
  pooling_param {
    pool: MAX
    kernel_size: 2
    stride: 2
  }
}
layer {
  name: "conv2"
  type: "Convolution"
  bottom: "pool1"
  top: "conv2"
  param {
    lr_mult: 1
  }
  param {
    lr_mult: 2
  }
  convolution_param {
    num_output: 50
    kernel_size: 5
    stride: 1
    weight_filler {
      type: "xavier"
    }
    bias_filler {
      type: "constant"
    }
  }
}
layer {
  name: "pool2"
  type: "Pooling"
  bottom: "conv2"
  top: "pool2"
  pooling_param {
    pool: MAX
    kernel_size: 2
    stride: 2
  }
}
layer {
  name: "ip1"
  type: "InnerProduct"
  bottom: "pool2"
  top: "ip1"
  param {
    lr_mult: 1
  }
  param {
    lr_mult: 2
  }
  inner_product_param {
    num_output: 500
    weight_filler {
      type: "xavier"
    }
    bias_filler {
      type: "constant"
    }
  }
}
layer {
  name: "relu1"
  type: "ReLU"
  bottom: "ip1"
  top: "ip1"
}

layer {
  name: "ip2"
  type: "InnerProduct"
  bottom: "ip1"
  top: "ip2"
  param {
    lr_mult: 1
  }
  param {
    lr_mult: 2
  }
  inner_product_param {
    num_output: 100
    weight_filler {
      type: "xavier"
    }
    bias_filler {
      type: "constant"
    }
  }
}

layer {
  name: "ip3_1"
  type: "InnerProduct"
  bottom: "ip2"
  top: "ip3_1"
  param {
    lr_mult: 1
  }
  param {
    lr_mult: 2
  }
  inner_product_param {
    num_output: 10
    weight_filler {
      type: "xavier"
    }
    bias_filler {
      type: "constant"
    }
  }
}

layer {
  name: "ip3_2"
  type: "InnerProduct"
  bottom: "ip2"
  top: "ip3_2"
  param {
    lr_mult: 1
  }
  param {
    lr_mult: 2
  }
  inner_product_param {
    num_output: 10
    weight_filler {
      type: "xavier"
    }
    bias_filler {
      type: "constant"
    }
  }
}

layer {
  name: "ip3_3"
  type: "InnerProduct"
  bottom: "ip2"
  top: "ip3_3"
  param {
    lr_mult: 1
  }
  param {
    lr_mult: 2
  }
  inner_product_param {
    num_output: 10
    weight_filler {
      type: "xavier"
    }
    bias_filler {
      type: "constant"
    }
  }
}

layer {
  name: "ip3_4"
  type: "InnerProduct"
  bottom: "ip2"
  top: "ip3_4"
  param {
    lr_mult: 1
  }
  param {
    lr_mult: 2
  }
  inner_product_param {
    num_output: 10
    weight_filler {
      type: "xavier"
    }
    bias_filler {
      type: "constant"
    }
  }
}

layer {
  name: "prob1"
  type: "Softmax"
  bottom: "ip3_1"
  top: "prob1"
}
layer {
  name: "prob2"
  type: "Softmax"
  bottom: "ip3_2"
  top: "prob2"
}
layer {
  name: "prob3"
  type: "Softmax"
  bottom: "ip3_3"
  top: "prob3"
}
layer {
  name: "prob4"
  type: "Softmax"
  bottom: "ip3_4"
  top: "prob4"
}
編寫測試程式碼:
import numpy as np
import os
import sys
os.environ['GLOG_minloglevel'] = '3'
import caffe

CAFFE_ROOT = '/home/mark/caffe'
deploy_file_name = 'captcha_deploy_lmdb.prototxt'
model_file_name  = 'captcha_iter_10000.caffemodel'

IMAGE_HEIGHT = 60
IMAGE_WIDTH = 160
IMAGE_CHANNEL = 3

def classify(imageFileName):
    deploy_file = CAFFE_ROOT + '/examples/captcha/' + deploy_file_name
    model_file  = CAFFE_ROOT + '/examples/captcha/' + model_file_name
    #初始化caffe
    net = caffe.Net(deploy_file, model_file, caffe.TEST)

    #資料預處理
    transformer = caffe.io.Transformer({'data': net.blobs['data'].data.shape})
    transformer.set_transpose('data', (2, 0, 1))#pycaffe讀取的圖片檔案格式為H×W×C,需轉化為C×H×W

    #pycaffe將圖片儲存為[0, 1], 如果模型輸入用的是0~255的原始格式,需要做如下轉換
    #transformer.set_raw_scale('data', 255)

    transformer.set_channel_swap('data', (2, 1, 0))#caffe中圖片是BGR格式,而原始格式是RGB,所以要轉化

    # 將輸入圖片格式轉化為合適格式(與deploy檔案相同)
    net.blobs['data'].reshape(1, IMAGE_CHANNEL, IMAGE_HEIGHT, IMAGE_WIDTH)

    #讀取圖片
    #引數color: True(default)是彩色圖,False是灰度圖
    img = caffe.io.load_image(imageFileName, color=True)

    #資料輸入、預處理
    net.blobs['data'].data[...] = transformer.preprocess('data', img)

    #前向迭代,即分類
    out = net.forward()

    #求出每個標籤概率最大值的下標
    result = []
    predict1 = out['prob1'][0].argmax()
    result.append(predict1)

    predict2 = out['prob2'][0].argmax()
    result.append(predict2)

    predict3 = out['prob3'][0].argmax()
    result.append(predict3)

    predict4 = out['prob4'][0].argmax()
    result.append(predict4)

    return result

if __name__ == '__main__':

   imgList = sys.argv[1:]
   for captcha in imgList:
       predict = classify(captcha)
print "captcha:", captcha, " predict:", predict 