
Caffe 實現多標籤分類
最近在用Caffe做驗證碼識別時,發現沒有用Tensorflow簡單(tensorflow中可以用one-hot, 參考我的另一篇blog: http://blog.csdn.net/sushiqian/article/details/78305340 ),需要修改Caffe的原始碼,做完後,覺得也不復雜。
1. 首先,就是修改原始碼了,
本文介紹的方法是修改ImageDataLayer,修改下面的三個檔案:
$CAFFE_ROOT/src/caffe/proto/caffe.proto
$CAFFE_ROOT/include/caffe/layers/image_data_layer.hpp
$CAFFE_ROOT/src/caffe/layers/image_data_layer.cpp
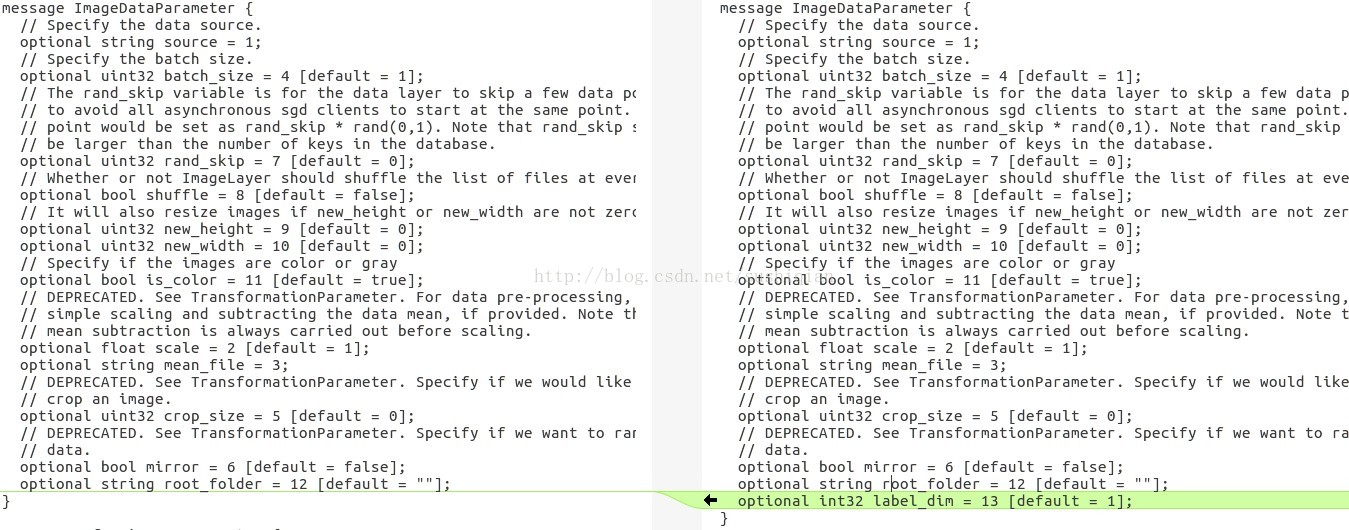
(1) 修改 caffe.proto
在檔案 caffe.proto 裡的 message ImageDataParameter { } 裡新增新的一項,用於表示標籤的維度
optional int32 label_dim = 13 [default = 1];
(2) 修改 image_data_layer.hpp
把原先成員 lines_ 的定義修改為
vector<std::pair<std::string, vector<int> > > lines_;

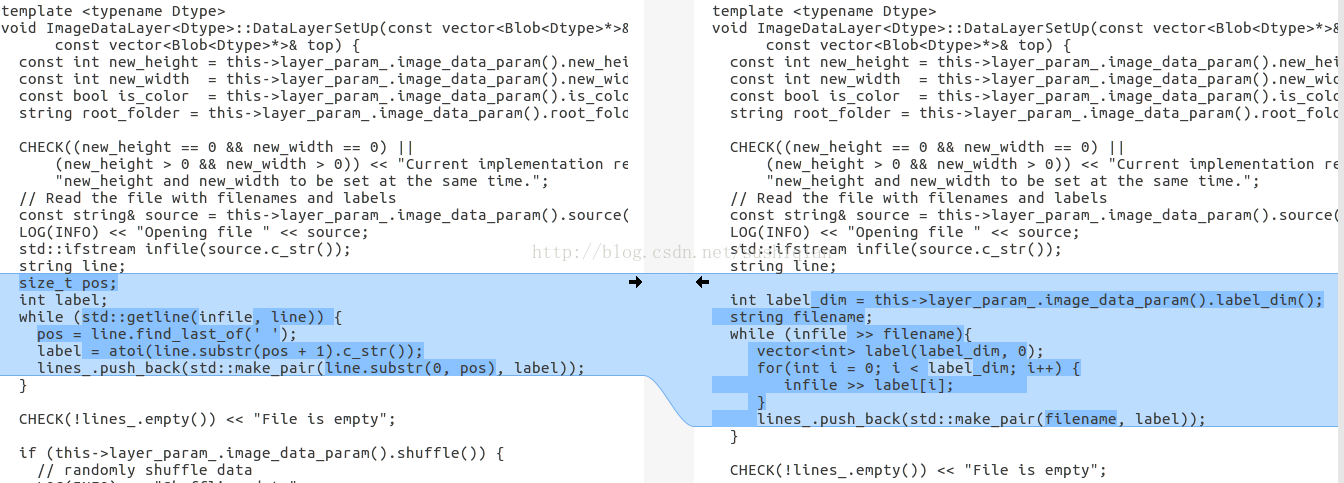
(3) 修改 image_data_layer.cpp
修改函式 DataLayerSetUp()
新的程式碼如下:
  int label_dim = this->layer_param_.image_data_param().label_dim();
  string filename;
  while (infile >> filename){
     vector<int> label(label_dim, 0);
     for(int i = 0; i < label_dim; i++) {
        infile >> label[i];
     }
     lines_.push_back(std::make_pair(filename, label));
  }
vector<int> label_shape(2);
label_shape[0] = batch_size;
label_shape[1] = label_dim;
修改函式 load_batch()
int label_dim = image_data_param.label_dim();
for(int i = 0;i < label_dim;++i){
    prefetch_label[item_id * label_dim + i] = lines_[lines_id_].second[i];
}
(4) 用 make 編譯
$CAFFE_ROOT/build$ make
$CAFFE_ROOT/build$ make install
2. 編寫用於訓練的網路結構
可以在caffe examples 裡的某個net上修改一個, 例如,本文中所講例子是在mnist中LeNet(lenet_train_test.prototxt)基礎上修改出一個net
captcha_train_test.prototxt
name: "captcha"
layer {
name: "Input"
type: "ImageData"
top: "data"
top: "label"
include {
phase: TRAIN
}
transform_param {
scale: 0.00390625
}
image_data_param {
source: "/home/mark/data/train.txt"
root_folder: "/home/mark/data/"
new_height: 60
new_width: 160
is_color: true
batch_size: 50
shuffle: true
label_dim: 4
}
}
layer {
name: "Input"
type: "ImageData"
top: "data"
top: "label"
include {
phase: TEST
}
transform_param {
scale: 0.00390625
}
image_data_param {
source: "/home/mark/data/test.txt"
root_folder: "/home/mark/data/"
new_height: 60
new_width: 160
is_color: true
batch_size: 20
shuffle: true
label_dim: 4
}
}
layer {
name: "slice"
type: "Slice"
bottom: "label"
top: "label_1"
top: "label_2"
top: "label_3"
top: "label_4"
slice_param {
axis: 1
slice_point:1
slice_point:2
slice_point:3
}
}
layer {
name: "conv1"
type: "Convolution"
bottom: "data"
top: "conv1"
param {
lr_mult: 1
}
param {
lr_mult: 2
}
convolution_param {
num_output: 20
kernel_size: 5
stride: 1
weight_filler {
type: "xavier"
}
bias_filler {
type: "constant"
}
}
}
layer {
name: "pool1"
type: "Pooling"
bottom: "conv1"
top: "pool1"
pooling_param {
pool: MAX
kernel_size: 2
stride: 2
}
}
layer {
name: "conv2"
type: "Convolution"
bottom: "pool1"
top: "conv2"
param {
lr_mult: 1
}
param {
lr_mult: 2
}
convolution_param {
num_output: 50
kernel_size: 5
stride: 1
weight_filler {
type: "xavier"
}
bias_filler {
type: "constant"
}
}
}
layer {
name: "pool2"
type: "Pooling"
bottom: "conv2"
top: "pool2"
pooling_param {
pool: MAX
kernel_size: 2
stride: 2
}
}
layer {
name: "ip1"
type: "InnerProduct"
bottom: "pool2"
top: "ip1"
param {
lr_mult: 1
}
param {
lr_mult: 2
}
inner_product_param {
num_output: 500
weight_filler {
type: "xavier"
}
bias_filler {
type: "constant"
}
}
}
layer {
name: "relu1"
type: "ReLU"
bottom: "ip1"
top: "ip1"
}
layer {
name: "ip2"
type: "InnerProduct"
bottom: "ip1"
top: "ip2"
param {
lr_mult: 1
}
param {
lr_mult: 2
}
inner_product_param {
num_output: 100
weight_filler {
type: "xavier"
}
bias_filler {
type: "constant"
}
}
}
layer {
name: "ip3_1"
type: "InnerProduct"
bottom: "ip2"
top: "ip3_1"
param {
lr_mult: 1
}
param {
lr_mult: 2
}
inner_product_param {
num_output: 10
weight_filler {
type: "xavier"
}
bias_filler {
type: "constant"
}
}
}
layer {
name: "ip3_2"
type: "InnerProduct"
bottom: "ip2"
top: "ip3_2"
param {
lr_mult: 1
}
param {
lr_mult: 2
}
inner_product_param {
num_output: 10
weight_filler {
type: "xavier"
}
bias_filler {
type: "constant"
}
}
}
layer {
name: "ip3_3"
type: "InnerProduct"
bottom: "ip2"
top: "ip3_3"
param {
lr_mult: 1
}
param {
lr_mult: 2
}
inner_product_param {
num_output: 10
weight_filler {
type: "xavier"
}
bias_filler {
type: "constant"
}
}
}
layer {
name: "ip3_4"
type: "InnerProduct"
bottom: "ip2"
top: "ip3_4"
param {
lr_mult: 1
}
param {
lr_mult: 2
}
inner_product_param {
num_output: 10
weight_filler {
type: "xavier"
}
bias_filler {
type: "constant"
}
}
}
layer {
name: "accuracy1"
type: "Accuracy"
bottom: "ip3_1"
bottom: "label_1"
top: "accuracy1"
include {
phase: TEST
}
}
layer {
name: "loss1"
type: "SoftmaxWithLoss"
bottom: "ip3_1"
bottom: "label_1"
top: "loss1"
}
layer {
name: "accuracy2"
type: "Accuracy"
bottom: "ip3_2"
bottom: "label_2"
top: "accuracy2"
include {
phase: TEST
}
}
layer {
name: "loss2"
type: "SoftmaxWithLoss"
bottom: "ip3_2"
bottom: "label_2"
top: "loss2"
}
layer {
name: "accuracy3"
type: "Accuracy"
bottom: "ip3_3"
bottom: "label_3"
top: "accuracy3"
include {
phase: TEST
}
}
layer {
name: "loss3"
type: "SoftmaxWithLoss"
bottom: "ip3_3"
bottom: "label_3"
top: "loss3"
}
layer {
name: "accuracy4"
type: "Accuracy"
bottom: "ip3_4"
bottom: "label_4"
top: "accuracy4"
include {
phase: TEST
}
}
layer {
name: "loss4"
type: "SoftmaxWithLoss"
bottom: "ip3_4"
bottom: "label_4"
top: "loss4"
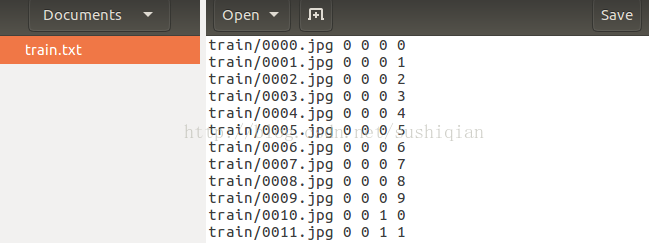
}/home/mark/data/train.txt 裡面存放的是訓練所用圖片的路徑和標籤,
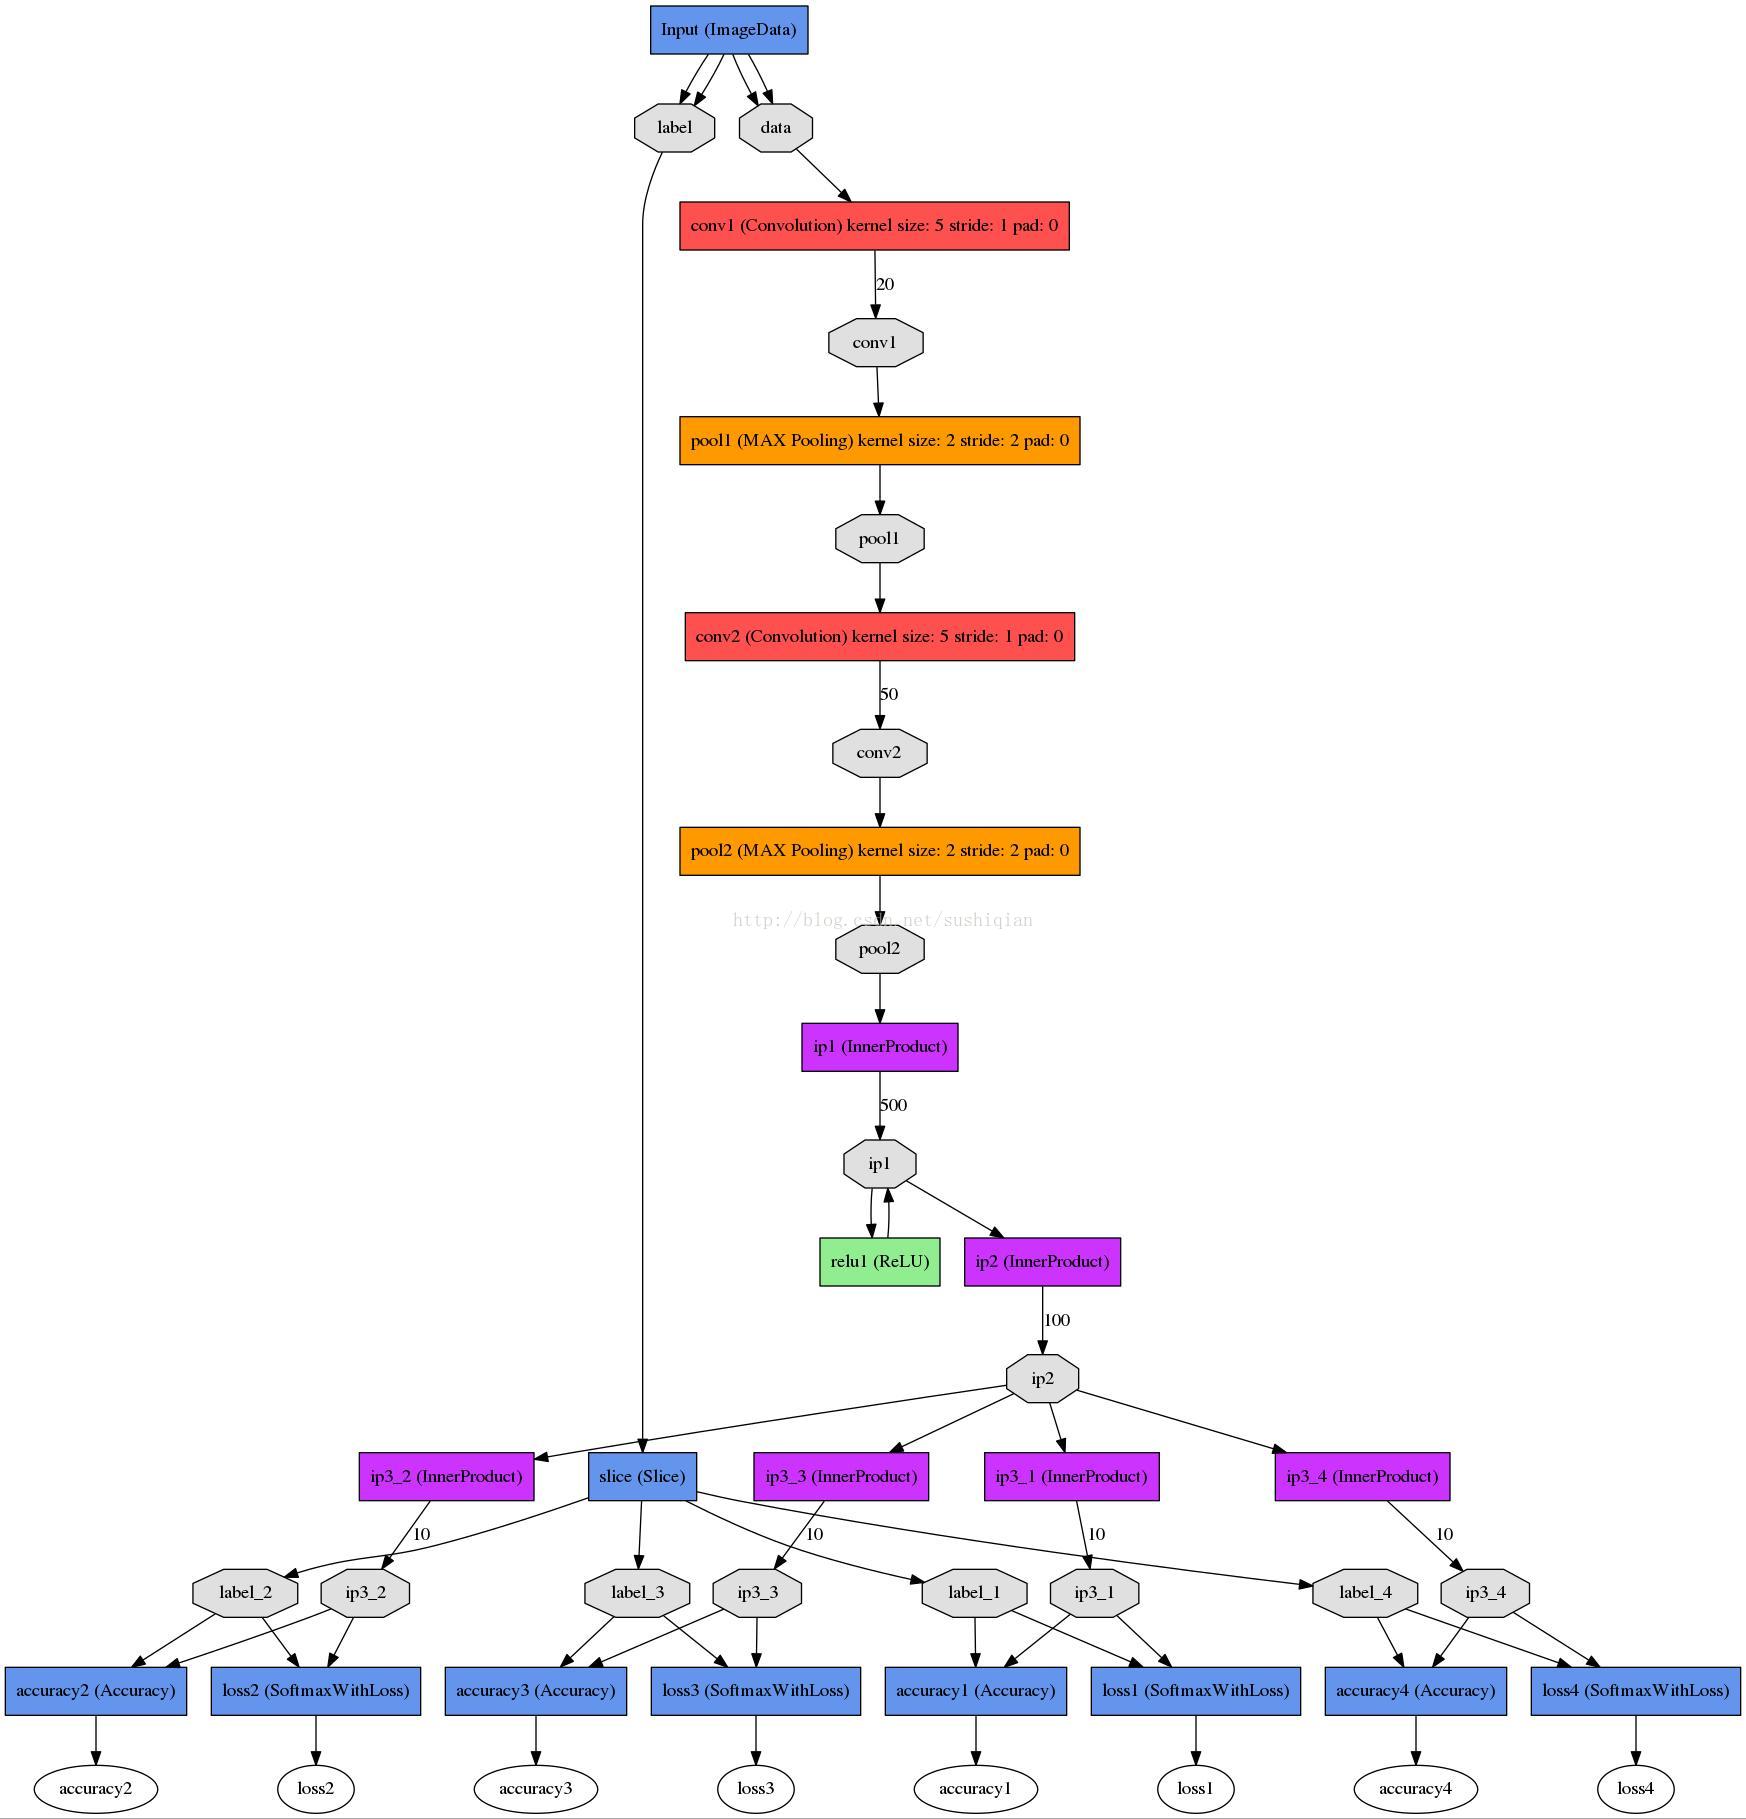
該網路的結構圖如下所示:
solver 檔案
captcha_solver.prototxt
# The train/test net protocol buffer definition
net: "examples/captcha/captcha_train_test.prototxt"
# test_iter specifies how many forward passes the test should carry out.
# covering the full 9,800 testing images.
test_iter: 200
# Carry out testing every 200 training iterations.
test_interval: 200
# The base learning rate, momentum and the weight decay of the network.
base_lr: 0.001
momentum: 0.9
weight_decay: 0.0005
# The learning rate policy
lr_policy: "inv"
gamma: 0.0001
power: 0.75
# Display every 100 iterations
display: 100
# The maximum number of iterations
max_iter: 10000
# snapshot intermediate results
snapshot: 5000
snapshot_prefix: "examples/captcha/captcha"
# solver mode: CPU or GPU
solver_mode: GPU./build/tools/caffe train --solver=examples/captcha/captcha_solver.prototxt
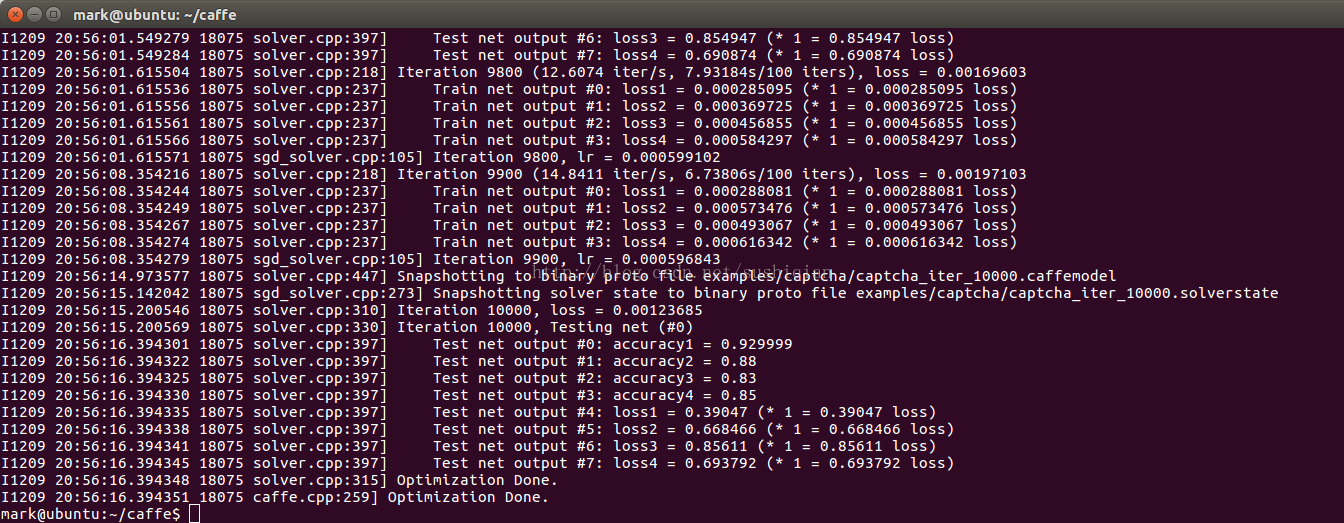
Note: 訓練過程中如果發現 loss 不下降,可以把學習率(base_lr)調小一點試試
3. 模型訓練成功後,進行測試
首先,需要一個deploy.prototxt檔案,在captcha_train_test.prototxt的基礎上修改,修改後儲存為 captcha_deploy.prototxt 內容如下
name: "captcha"

input: "data"
input_dim: 1   # batchsize
input_dim: 3   # number of channels - rgb
input_dim: 60  # height
input_dim: 160 # width

layer {
  name: "conv1"
  type: "Convolution"
  bottom: "data"
  top: "conv1"
  param {
    lr_mult: 1
  }
  param {
    lr_mult: 2
  }
  convolution_param {
    num_output: 20
    kernel_size: 5
    stride: 1
    weight_filler {
      type: "xavier"
    }
    bias_filler {
      type: "constant"
    }
  }
}
layer {
  name: "pool1"
  type: "Pooling"
  bottom: "conv1"
  top: "pool1"
  pooling_param {
    pool: MAX
    kernel_size: 2
    stride: 2
  }
}
layer {
  name: "conv2"
  type: "Convolution"
  bottom: "pool1"
  top: "conv2"
  param {
    lr_mult: 1
  }
  param {
    lr_mult: 2
  }
  convolution_param {
    num_output: 50
    kernel_size: 5
    stride: 1
    weight_filler {
      type: "xavier"
    }
    bias_filler {
      type: "constant"
    }
  }
}
layer {
  name: "pool2"
  type: "Pooling"
  bottom: "conv2"
  top: "pool2"
  pooling_param {
    pool: MAX
    kernel_size: 2
    stride: 2
  }
}
layer {
  name: "ip1"
  type: "InnerProduct"
  bottom: "pool2"
  top: "ip1"
  param {
    lr_mult: 1
  }
  param {
    lr_mult: 2
  }
  inner_product_param {
    num_output: 500
    weight_filler {
      type: "xavier"
    }
    bias_filler {
      type: "constant"
    }
  }
}
layer {
  name: "relu1"
  type: "ReLU"
  bottom: "ip1"
  top: "ip1"
}

layer {
  name: "ip2"
  type: "InnerProduct"
  bottom: "ip1"
  top: "ip2"
  param {
    lr_mult: 1
  }
  param {
    lr_mult: 2
  }
  inner_product_param {
    num_output: 100
    weight_filler {
      type: "xavier"
    }
    bias_filler {
      type: "constant"
    }
  }
}

layer {
  name: "ip3_1"
  type: "InnerProduct"
  bottom: "ip2"
  top: "ip3_1"
  param {
    lr_mult: 1
  }
  param {
    lr_mult: 2
  }
  inner_product_param {
    num_output: 10
    weight_filler {
      type: "xavier"
    }
    bias_filler {
      type: "constant"
    }
  }
}

layer {
  name: "ip3_2"
  type: "InnerProduct"
  bottom: "ip2"
  top: "ip3_2"
  param {
    lr_mult: 1
  }
  param {
    lr_mult: 2
  }
  inner_product_param {
    num_output: 10
    weight_filler {
      type: "xavier"
    }
    bias_filler {
      type: "constant"
    }
  }
}

layer {
  name: "ip3_3"
  type: "InnerProduct"
  bottom: "ip2"
  top: "ip3_3"
  param {
    lr_mult: 1
  }
  param {
    lr_mult: 2
  }
  inner_product_param {
    num_output: 10
    weight_filler {
      type: "xavier"
    }
    bias_filler {
      type: "constant"
    }
  }
}

layer {
  name: "ip3_4"
  type: "InnerProduct"
  bottom: "ip2"
  top: "ip3_4"
  param {
    lr_mult: 1
  }
  param {
    lr_mult: 2
  }
  inner_product_param {
    num_output: 10
    weight_filler {
      type: "xavier"
    }
    bias_filler {
      type: "constant"
    }
  }
}

layer {
  name: "prob1"
  type: "Softmax"
  bottom: "ip3_1"
  top: "prob1"
}
layer {
  name: "prob2"
  type: "Softmax"
  bottom: "ip3_2"
  top: "prob2"
}
layer {
  name: "prob3"
  type: "Softmax"
  bottom: "ip3_3"
  top: "prob3"
}
layer {
  name: "prob4"
  type: "Softmax"
  bottom: "ip3_4"
  top: "prob4"
}
編寫測試程式碼:
import numpy as np
import os
import sys
os.environ['GLOG_minloglevel'] = '3'
import caffe

CAFFE_ROOT = '/home/mark/caffe'
deploy_file_name = 'captcha_deploy.prototxt'
model_file_name  = 'captcha_iter_10000.caffemodel'

IMAGE_HEIGHT = 60
IMAGE_WIDTH = 160
IMAGE_CHANNEL = 3

def classify(imageFileName):
    deploy_file = CAFFE_ROOT + '/examples/captcha/' + deploy_file_name
    model_file  = CAFFE_ROOT + '/examples/captcha/' + model_file_name
    #初始化caffe
    net = caffe.Net(deploy_file, model_file, caffe.TEST)

    #資料預處理
    transformer = caffe.io.Transformer({'data': net.blobs['data'].data.shape})
    transformer.set_transpose('data', (2, 0, 1))#pycaffe讀取的圖片檔案格式為H×W×C,需轉化為C×H×W

    #pycaffe將圖片儲存為[0, 1], 如果模型輸入用的是0~255的原始格式,需要做如下轉換
    #transformer.set_raw_scale('data', 255)

    transformer.set_channel_swap('data', (2, 1, 0))#caffe中圖片是BGR格式,而原始格式是RGB,所以要轉化

    # 將輸入圖片格式轉化為合適格式(與deploy檔案相同)
    net.blobs['data'].reshape(1, IMAGE_CHANNEL, IMAGE_HEIGHT, IMAGE_WIDTH)

    #讀取圖片
    #引數color: True(default)是彩色圖,False是灰度圖
    img = caffe.io.load_image(imageFileName, color=True)

    #資料輸入、預處理
    net.blobs['data'].data[...] = transformer.preprocess('data', img)

    #前向迭代,即分類
    out = net.forward()

    #求出每個標籤概率最大值的下標
    result = []
    predict1 = out['prob1'][0].argmax()
    result.append(predict1)

    predict2 = out['prob2'][0].argmax()
    result.append(predict2)

    predict3 = out['prob3'][0].argmax()
    result.append(predict3)

    predict4 = out['prob4'][0].argmax()
    result.append(predict4)

    return result

if __name__ == '__main__':

   imgList = sys.argv[1:]
   for captcha in imgList:
       predict = classify(captcha)
       print "captcha:", captcha, "  predict:", predict
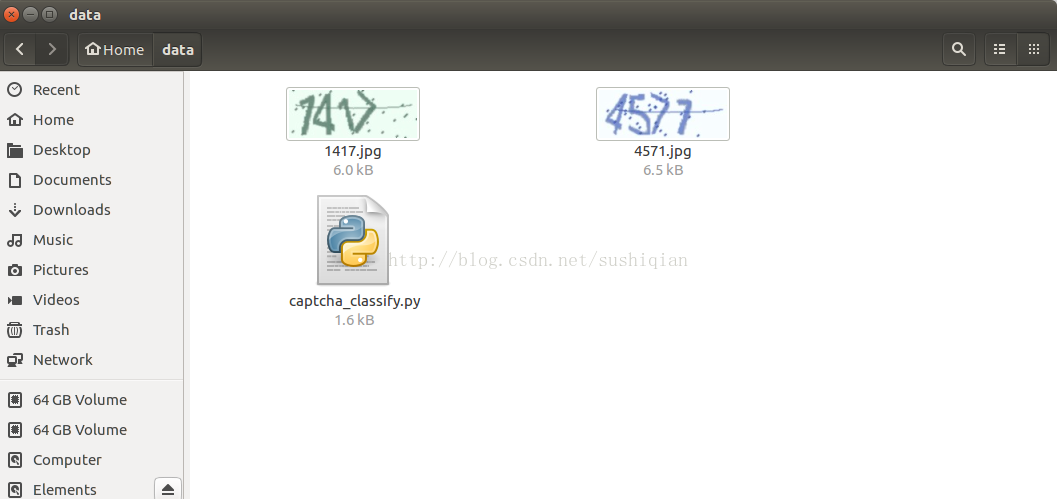
執行上面的指令碼,進行測試

測試用到的圖片如下
相關推薦
caffe實現多標籤分類
最近在參加一個識別的競賽,專案裡涉及了許多類別的分類,原本打算一個大的類別訓練一個分類模型,但是這樣會比較麻煩,對於同一圖片的分類會重複計算分類網路中的卷積層,浪費計算時間和效率。後來發現現在深度學習中的多工學習可以實現多標籤分類,所有的類別只需要訓練一個分類模型就行,其不同屬性的類別之間是共享卷積層的。我
Caffe 實現多標籤分類 支援Multi-Label的LMDB資料格式輸入
Caffe自帶的影象轉LMDB介面只支援單label,對於多label的任務,可以使用HDF5的格式,也可以通過修改caffe程式碼來實現, 我的文章Caffe 實現多標籤分類 裡介紹了怎麼通過修改ImageDataLayer來實現Multilabel的任務, 本篇文章介紹
Caffe 實現多標籤分類
最近在用Caffe做驗證碼識別時,發現沒有用Tensorflow簡單(tensorflow中可以用one-hot, 參考我的另一篇blog: http://blog.csdn.net/sushiqian/article/details/78305340 ),需要修改Caf
Caffe實現多標籤影象分類(1)——基於Python介面實現多標籤影象分類(VOC2012)
1.前言 Caffe可以通過LMDB或LevelDB資料格式實現影象資料及標籤的輸入,不過這隻限於單標籤影象資料的輸入。由於研究生期間所從事的研究是影象標註領域,在進行影象標註時,每幅影象都是多標籤的,因此在使用Caffe進行遷移學習時需要實現多標籤影象資料
基於keras實現多標籤分類(multi-label classification)
首先討論多標籤分類資料集(以及如何快速構建自己的資料集)。 之後簡要討論SmallerVGGNet,我們將實現的Keras神經網路架構,並用於多標籤分類。 然後我們將實施SmallerVGGNet並使用我們的多標籤分類資料集對其進行訓練。 最後,我們將通過在示例影象上測試我
2.CNN圖片多標籤分類(基於TensorFlow實現驗證碼識別OCR)
上一篇實現了圖片CNN單標籤分類(貓狗圖片分類任務) 地址:juejin.im/post/5c0739… 預告:下一篇用LSTM+CTC實現不定長文字的OCR,本質上是一種不固定標籤個數的多標籤分類問題 本文所用到的10w驗證碼資料集百度網盤下載地址(也可使用下文程式碼自行生成): pan.baidu
Caffe中LMDB介面實現多標籤資料準備及訓練
有不少部落格講Caffe多標籤輸入的問題,但總覺得講的不夠透徹,在實踐角度上沒有給出詳細的指導,所以本文力求能給出詳細的實踐過程和說明。 Caffe多標籤輸入常用的的方法有以下幾種: 1. 修改Caffe原始碼使其支援多標籤輸入,參考CSDN部落格《
caffe多工學習之多標籤分類
最近在參加一個識別的競賽,專案裡涉及了許多類別的分類,原本打算一個大的類別訓練一個分類模型,但是這樣會比較麻煩,對於同一圖片的分類會重複計算分類網路中的卷積層,浪費計算時間和效率。後來發現現在深度學習中的多工學習可以實現
caffe實現多任務學習
mdb ice 學習 caf tro con targe slice eset 1. 采用多label的lmdb+Slice Layer的方法 http://blog.csdn.net/u013010889/article/details/53098346 2. 修改數
多標籤分類的結果評估---macro-average和micro-average介紹
一,多分類的混淆矩陣 多分類混淆矩陣是二分類混淆矩陣的擴充套件 祭出程式碼,畫線的那兩行就是關鍵啦: 二,檢視多分類的評估報告 祭出程式碼,使用了classicfication_report() 三,巨集平均與微平均 公式是神看的,我是學弱...直接看例子,沒有複雜的公
多標籤分類(multi-label classification)
意義 網路新聞往往含有豐富的語義,一篇文章既可以屬於“經濟”也可以屬於“文化”。給網路新聞打多標籤可以更好地反應文章的真實意義,方便日後的分類和使用。 難點 (1)類標數量不確定,有些樣本可能只有一個類標,有些樣本的類標可能高達幾十甚至上百個。
針對科技文章的多標籤分類
0. 起 最近沒有更新。暑假之後學的東西也比較雜,看了一下基於DL的智慧美顏,感覺入了個大坑。前前後後看了傳統的輪廓提取演算法和FCN等等,調程式碼巴拉巴拉幾個星期就這麼過了。前幾天看ACM的best paper也覺得很有意思,兩個步驟:1)給圖片打標題,屬於多媒體計算和NLP的結合 2)由標題生成詩歌
資料庫百科---實現多標籤篩選
一、背景 在一些視訊網站(如:優酷、愛奇藝等),都會有篩選功能。 但當我使用這個篩選功能時,發現其只能進行單型別篩選,例如電影型別只能按某一種型別進行篩選。如果想看既是科幻電影又是戰爭的電影呢?顯然單個標籤型別篩選是滿足不了這個需求的,接下來簡要談談我的實現方法。
解決多標籤分類問題(包括案例研究)
由於某些原因,迴歸和分類問題總會引起機器學習領域的大部分關注。多標籤分類在資料科學中是一個比較令人頭疼的問題。在這篇文章中,我將給你一個直觀的解釋,說明什麼是多標籤分類,以及如何解決這個問題。 1.多標籤分類是什麼? 讓我們來看看下面的圖片。 如果我問你這幅圖中有一
來自語義資訊理論的多標籤分類方法——有簡單方法幹嘛要用複雜的?
流行的多標籤分類方法大多把多分類化為多個二分類。流行的有One-to-Rest方法和Binary Relevance方法。 One-to-Rest方法的問題是, 圍繞一個標籤y1分類, 把一個沒有y的例子當成y1的反例, 這時不對的。 比如兩個例子(25歲, “年輕人”)和
Python和PyTorch對比實現多標籤softmax + cross-entropy交叉熵損失及反向傳播
相關 關於 softmax + cross-entropy 的詳細介紹, 請參考 : BrightLamp. 多標籤softmax + cross-entropy交叉熵損失函式詳解及反向傳播中的梯度求導[EB/OL]. https://blog.csdn.net
多標籤分類之改進的神經網路方法
Improved Multilabel Classification with Neural Networks 2008 International Conference on Parallel Problem Solving from Nature Rafa
keras 自定義ImageDataGenerator用於多標籤分類
感想 keras提供了flow_from_directory用於單個標籤分類,但是對圖片的多標籤分類沒有支援,這就需要我們自己動手實現ImageDataGenerator,我這裡把我實現的用於多標籤分類的自定義DataGenerator分享出來,讀者可以根據自己的情況來進行修改。 資料集
多標籤分類(multilabel classification )
為了區分多分類,先從基本的概念上開始: 二分類:投擲硬幣,結果是正面或者反面,可以選擇的類別只有兩個,並且確切的結果只能有一個,類別互斥,即一枚硬幣的投擲結果要麼是正面要麼是反面,不同同時出現 多分
keras解決多標籤分類問題
multi-class classification problem: 多分類問題是相對於二分類問題(典型的0-1分類)來說的,意思是類別總數超過兩個的分類問題,比如手寫數字識別mnist的label總數有10個,每一個樣本的標籤在這10箇中取一個。 mult