
SpringCloud 學習筆記------服務鏈路追蹤(Spring Cloud Sleuth)
一、理論準備
目前以我的理解能力,能看明白的就是一句話——哪個介面呼叫了哪個介面,傳遞了什麼資料,花了多長時間。
Spring Cloud Sleuth 主要功能就是在分散式系統中提供追蹤解決方案,並且相容支援了 zipkin,你只需要在pom檔案中引入相應的依賴即可。
二、一些術語
- Span:基本工作單元,例如,在一個新建的span中傳送一個RPC等同於傳送一個迴應請求給RPC,span通過一個64位ID唯一標識,trace以另一個64位ID表示,span還有其他資料資訊,比如摘要、時間戳事件、關鍵值註釋(tags)、span的ID、以及進度ID(通常是IP地址)
- span在不斷的啟動和停止,同時記錄了時間資訊,當你建立了一個span,你必須在未來的某個時刻停止它。
- Trace:一系列spans組成的一個樹狀結構,例如,如果你正在跑一個分散式大資料工程,你可能需要建立一個trace。
- Annotation:用來及時記錄一個事件的存在,一些核心annotations用來定義一個請求的開始和結束
- cs - Client Sent -客戶端發起一個請求,這個annotion描述了這個span的開始
- sr - Server Received -服務端獲得請求並準備開始處理它,如果將其sr減去cs時間戳便可得到網路延遲
- ss - Server Sent -註解表明請求處理的完成(當請求返回客戶端),如果ss減去sr時間戳便可得到服務端需要的處理請求時間
- cr - Client Received -表明span的結束,客戶端成功接收到服務端的回覆,如果cr減去cs時間戳便可得到客戶端從服務端獲取回覆的所有所需時間
將Span和Trace在一個系統中使用Zipkin註解的過程圖形化:

三、構建三個專案
這三個專案分別是server-zipkin、service-hi、servicemiya。暫時理解為一個監控器兩個服務提供者。
1.新建server-zipkin專案。
1.1 pom.xml檔案引入zipkin依賴包。
<?xml version="1.0" encoding="UTF-8"?>
<project xmlns="http://maven.apache.org/POM/4.0.0" xmlns:xsi="http://www.w3.org/2001/XMLSchema-instance"
	xsi:schemaLocation="http://maven.apache.org/POM/4.0.0 http://maven.apache.org/xsd/maven-4.0.0.xsd">
	<modelVersion>4.0.0</modelVersion>

	<groupId>com.byk</groupId>
	<artifactId>server-zipkin</artifactId>
	<version>0.0.1-SNAPSHOT</version>
	<packaging>jar</packaging>

	<name>server-zipkin</name>
	<description>Demo project for Spring Boot</description>

	<parent>
		<groupId>org.springframework.boot</groupId>
		<artifactId>spring-boot-starter-parent</artifactId>
		<version>1.5.2.RELEASE</version>
		<relativePath/> <!-- lookup parent from repository -->
	</parent>

	<properties>
		<project.build.sourceEncoding>UTF-8</project.build.sourceEncoding>
		<project.reporting.outputEncoding>UTF-8</project.reporting.outputEncoding>
		<java.version>1.8</java.version>
	</properties>

	<dependencies>
		<dependency>
			<groupId>org.springframework.boot</groupId>
			<artifactId>spring-boot-starter</artifactId>
		</dependency>

		<dependency>
			<groupId>org.springframework.boot</groupId>
			<artifactId>spring-boot-starter-web</artifactId>
		</dependency>
		<dependency>
			<groupId>org.springframework.boot</groupId>
			<artifactId>spring-boot-starter-test</artifactId>
			<scope>test</scope>
		</dependency>

		<dependency>
			<groupId>io.zipkin.java</groupId>
			<artifactId>zipkin-server</artifactId>
		</dependency>

		<dependency>
			<groupId>io.zipkin.java</groupId>
			<artifactId>zipkin-autoconfigure-ui</artifactId>
		</dependency>

	</dependencies>

	<dependencyManagement>
		<dependencies>
			<dependency>
				<groupId>org.springframework.cloud</groupId>
				<artifactId>spring-cloud-dependencies</artifactId>
				<version>Camden.SR6</version>
				<type>pom</type>
				<scope>import</scope>
			</dependency>
		</dependencies>
	</dependencyManagement>

	<build>
		<plugins>
			<plugin>
				<groupId>org.springframework.boot</groupId>
				<artifactId>spring-boot-maven-plugin</artifactId>
			</plugin>
		</plugins>
	</build>

</project>
1.2 application.properties檔案指定埠號。
server.port=94111.3 主啟動類加@EnableZipkinServer標籤。
import org.springframework.boot.SpringApplication;
import org.springframework.boot.autoconfigure.SpringBootApplication;
import zipkin.server.EnableZipkinServer;
@SpringBootApplication
@EnableZipkinServer
public class ServerZipkinApplication {
public static void main(String[] args) {
SpringApplication.run(ServerZipkinApplication.class, args);
}
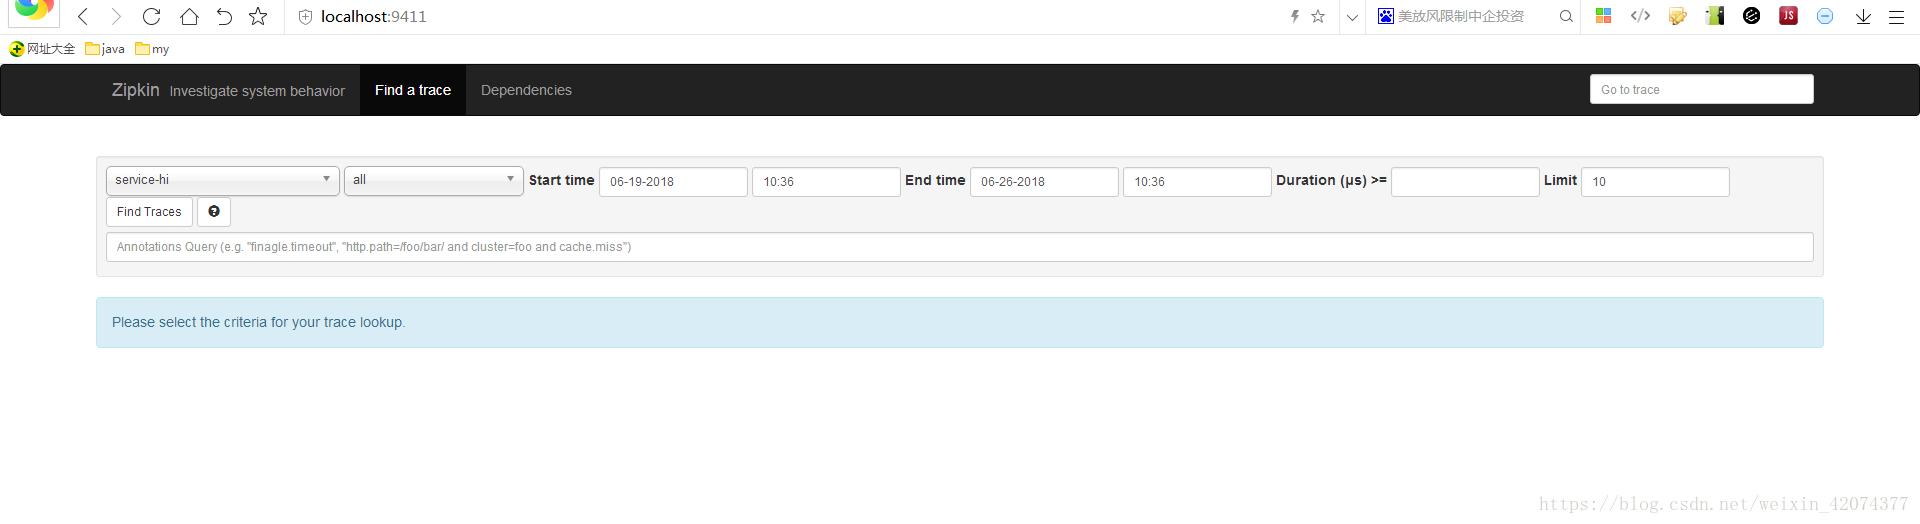
}1.4 啟動專案,瀏覽器訪問http://localhost:9411,如下:
2 . 新建service-hi專案。
2.1 pom.xml檔案。
<?xml version="1.0" encoding="UTF-8"?>
<project xmlns="http://maven.apache.org/POM/4.0.0" xmlns:xsi="http://www.w3.org/2001/XMLSchema-instance"
		 xsi:schemaLocation="http://maven.apache.org/POM/4.0.0 http://maven.apache.org/xsd/maven-4.0.0.xsd">
	<modelVersion>4.0.0</modelVersion>

	<groupId>com.byk</groupId>
	<artifactId>service-zipkin</artifactId>
	<version>0.0.1-SNAPSHOT</version>
	<packaging>jar</packaging>

	<name>service-hi</name>
	<description>Demo project for Spring Boot</description>

	<parent>
		<groupId>org.springframework.boot</groupId>
		<artifactId>spring-boot-starter-parent</artifactId>
		<version>1.5.2.RELEASE</version>
		<relativePath/> <!-- lookup parent from repository -->
	</parent>

	<properties>
		<project.build.sourceEncoding>UTF-8</project.build.sourceEncoding>
		<project.reporting.outputEncoding>UTF-8</project.reporting.outputEncoding>
		<java.version>1.8</java.version>
	</properties>

	<dependencies>

		<dependency>
			<groupId>org.springframework.boot</groupId>
			<artifactId>spring-boot-starter-web</artifactId>
		</dependency>

		<!--zipkin相關-->
		<dependency>
			<groupId>org.springframework.cloud</groupId>
			<artifactId>spring-cloud-starter-zipkin</artifactId>
		</dependency>

		<dependency>
			<groupId>org.springframework.boot</groupId>
			<artifactId>spring-boot-starter-test</artifactId>
			<scope>test</scope>
		</dependency>
	</dependencies>

	<dependencyManagement>
		<dependencies>
			<dependency>
				<groupId>org.springframework.cloud</groupId>
				<artifactId>spring-cloud-dependencies</artifactId>
				<version>Dalston.RC1</version>
				<type>pom</type>
				<scope>import</scope>
			</dependency>
		</dependencies>
	</dependencyManagement>

	<build>
		<plugins>
			<plugin>
				<groupId>org.springframework.boot</groupId>
				<artifactId>spring-boot-maven-plugin</artifactId>
			</plugin>
		</plugins>
	</build>

	<repositories>
		<repository>
			<id>spring-milestones</id>
			<name>Spring Milestones</name>
			<url>https://repo.spring.io/milestone</url>
			<snapshots>
				<enabled>false</enabled>
			</snapshots>
		</repository>
	</repositories>


</project>
2.2 application.properties檔案,指定埠號和服務名,並指定追蹤器。
server.port=8988
spring.zipkin.base-url=http://localhost:9411
spring.application.name=service-hiimport com.byk.servicehi.ServiceHiApplication;
import org.springframework.beans.factory.annotation.Autowired;
import org.springframework.context.annotation.Bean;
import org.springframework.web.bind.annotation.RequestMapping;
import org.springframework.web.bind.annotation.RestController;
import org.springframework.web.client.RestTemplate;
import org.springframework.cloud.sleuth.sampler.AlwaysSampler;
import java.util.logging.Level;
import java.util.logging.Logger;
/**
* @Author: bian
* @Date: 2018/6/25 17:14
* @Todo:
*/
@RestController
public class HomeController {
private static final Logger LOG = Logger.getLogger(ServiceHiApplication.class.getName());
@Autowired
private RestTemplate restTemplate;
@Bean
public RestTemplate getRestTemplate(){
return new RestTemplate();
}
@RequestMapping("/hi")
public String callHome(){
LOG.log(Level.INFO, "請求 service-hi ");
LOG.log(Level.INFO,"又跑去請求 http://localhost:8989/miya");
return restTemplate.getForObject("http://localhost:8989/miya", String.class);
}
@RequestMapping("/hello")
public String info(){
LOG.log(Level.INFO, "請求 service-hi ");
return "i'm service-hi";
}
@Bean
public AlwaysSampler defaultSampler(){
return new AlwaysSampler();
}
}
3.新建service-miya專案。
3.1 pom.xml檔案
同service-hi專案。
3.2 application.properties 檔案
server.port=8989
spring.zipkin.base-url=http://localhost:9411
spring.application.name=service-miya
3.3 新建HomeController檔案。
import com.byk.servicemiya.ServiceMiyaApplication;
import org.springframework.beans.factory.annotation.Autowired;
import org.springframework.context.annotation.Bean;
import org.springframework.web.bind.annotation.RequestMapping;
import org.springframework.web.bind.annotation.RestController;
import org.springframework.web.client.RestTemplate;

import java.util.logging.Level;
import java.util.logging.Logger;

/**
 * @Author: bian
 * @Date: 2018/6/26 10:48
 * @Todo:
 */
@RestController
public class HomeController {

    private static final Logger LOG = Logger.getLogger(ServiceMiyaApplication.class.getName());


    @Autowired
    private RestTemplate restTemplate;

    @Bean
    public RestTemplate getRestTemplate(){
        return new RestTemplate();
    }

    @RequestMapping("/miya")
    public String callHome(){
        LOG.log(Level.INFO, "請求 service-miya  ");
        LOG.log(Level.INFO,"又請求 http://localhost:8988/hello ");
        return restTemplate.getForObject("http://localhost:8988/hello", String.class);
    }
    @RequestMapping("/info")
    public String info(){
        LOG.log(Level.INFO, "請求 service-miya ");

        return "i'm service-miya";

    }

}
四、驗證
分別啟動三個專案。
1.訪問http://localhost:9411,如下:

2.訪問http://localhost:8988/hi,如下:

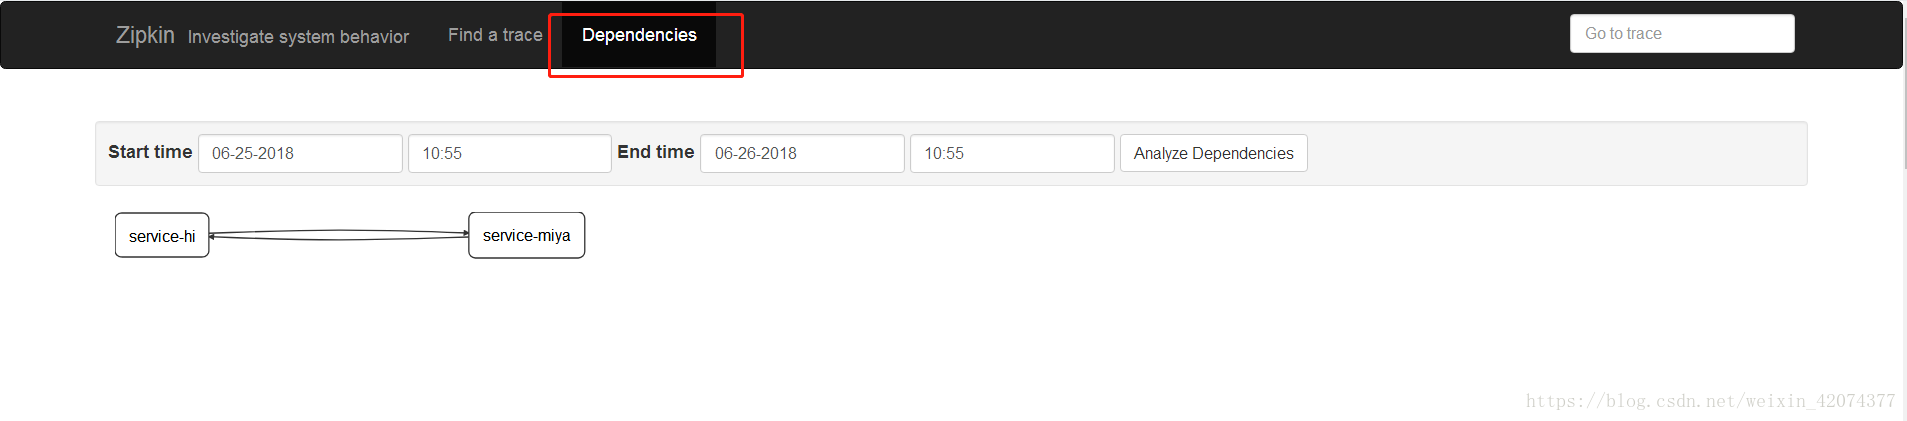
3.檢視之前server-zipkin的介面,切勿重新整理。
3.1 點選Denpendencies,發現追蹤器已經起作用了。
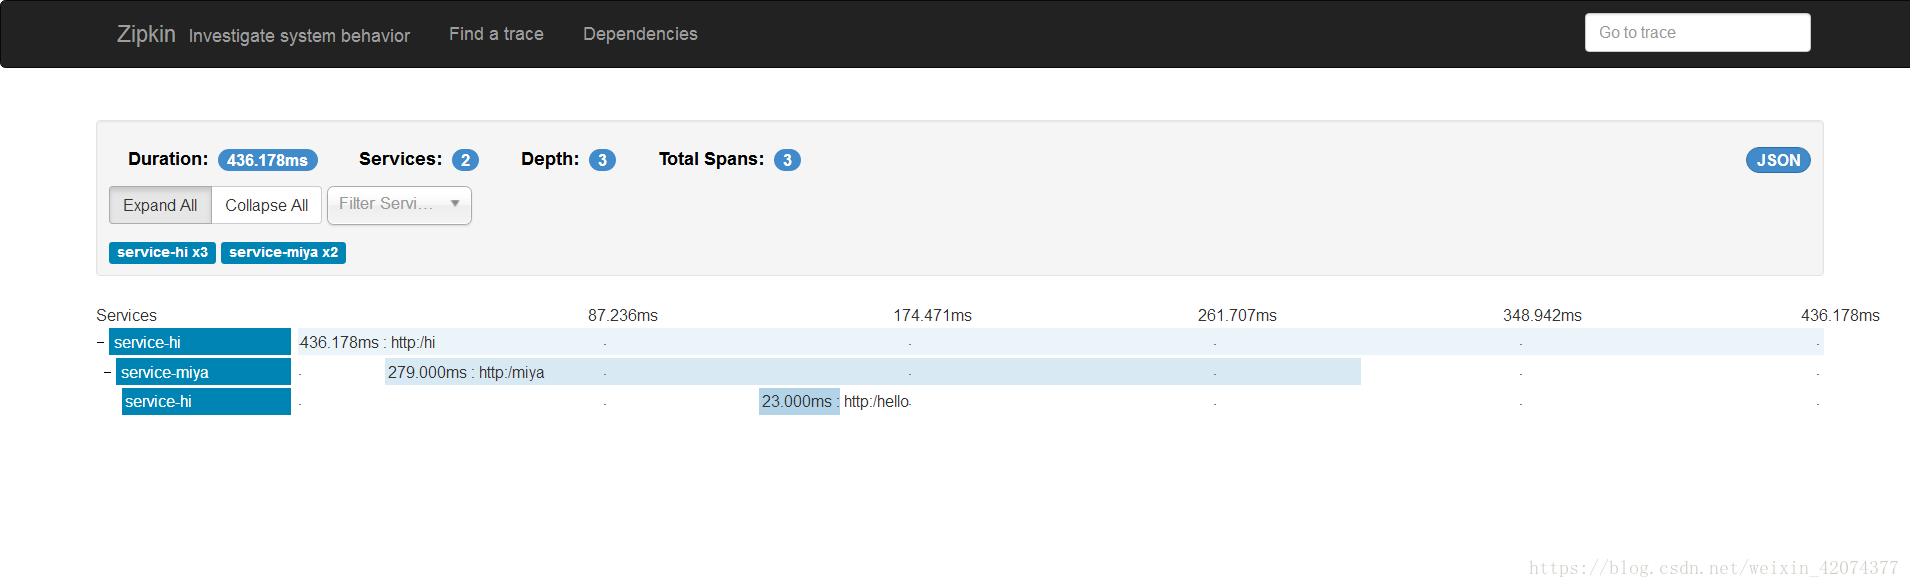
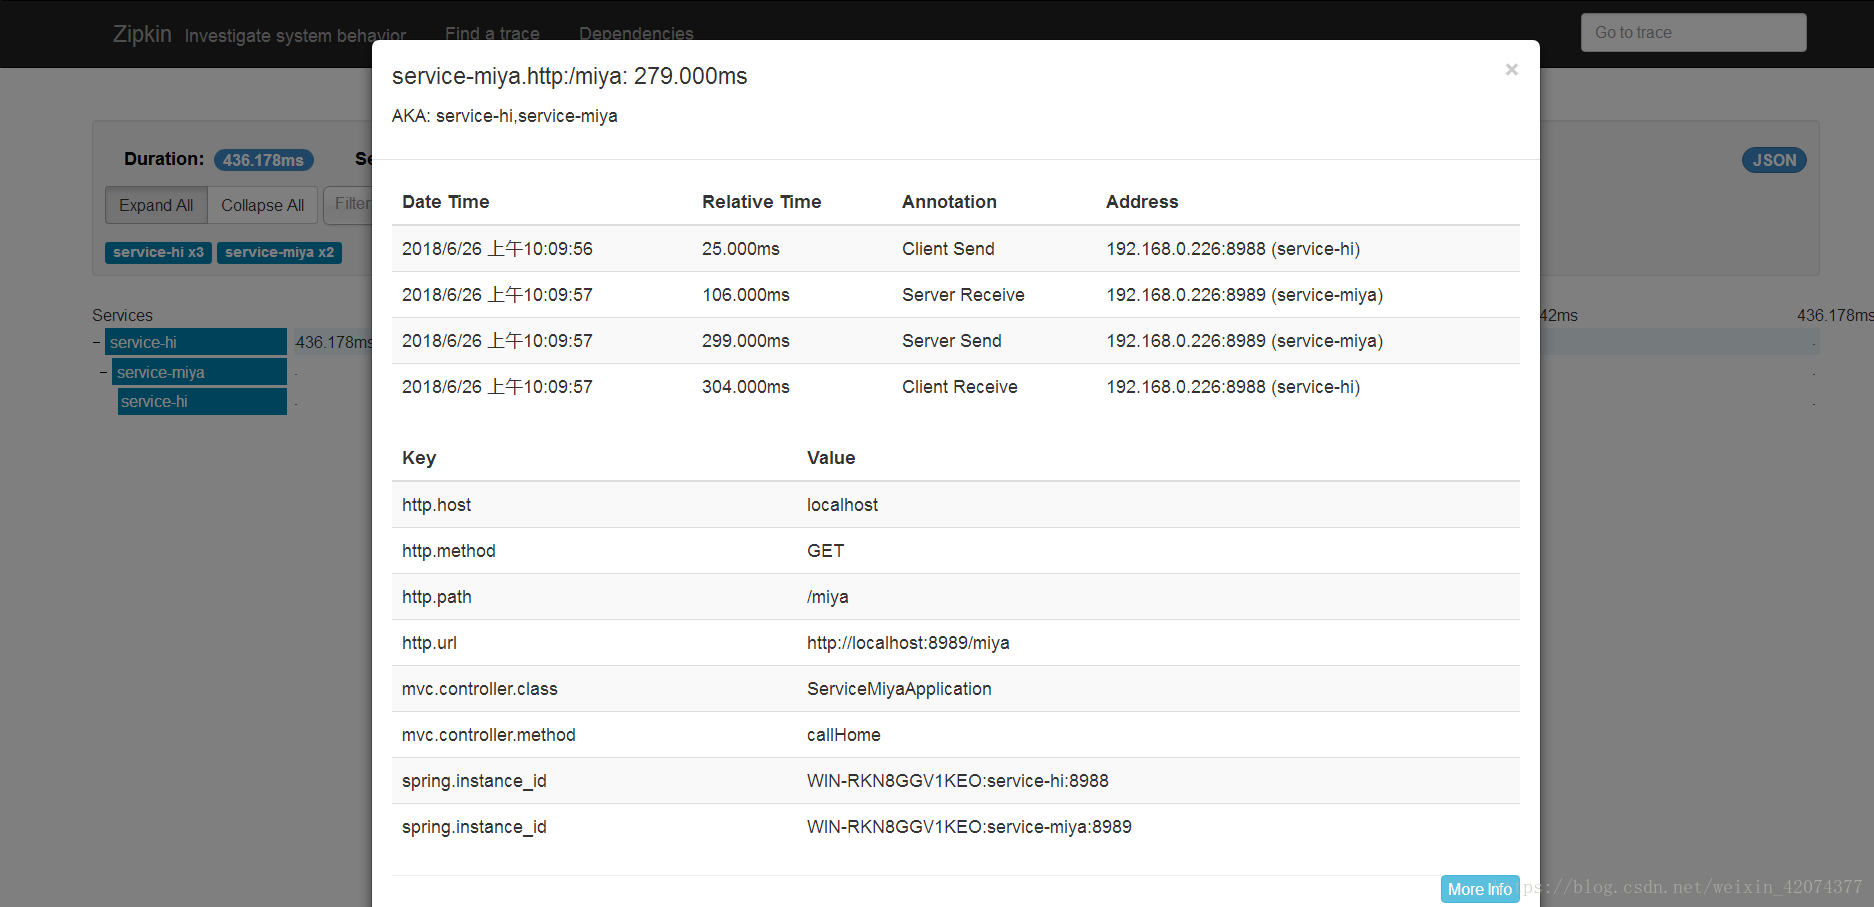
3.2 點選Find a trace ,檢視具體的介面呼叫資訊。

五、一些坑
1.我自己新建的專案,pom.xml檔案中版本是2.0.3.RELEASE,跑不起來,降低版本改成1.5.2,就可以了。
2.有時候(並不是每個人的專案都會出現這種情況)在Zipkin-Traces中看不到資料,那是因為預設sleuth收集資訊的比率是0.1 ,針對於這個問題有兩種解決方法:
- 在配置檔案中配置 spring.sleuth.sampler.percentage=1
- 在程式碼中宣告
     @Bean
    public AlwaysSampler defaultSampler(){
        return new AlwaysSampler();
    }
3.我的AlwaysSampler 一開始也報錯,網上找的資料說把上面的程式碼改成
 @Bean
    public Sampler defaultSampler() {
        return Sampler.ALWAYS_SAMPLE;
    }
我試了,沒用,還是直接複製個pom.xml檔案管用。