OpenCV—python 影象矯正(基於傅立葉變換—基於透視變換)
影象校正執行環境
Anaconda| pycharm/jupyter notebook你需要安裝如下庫
pip install numpy
pip install matplotlib
pip install opencv-python
一、基於傅立葉變換的影象矯正
1.1 傅立葉變換原理
2維影象的傅立葉變換可以用以下數學公式表達:
式中 是空間域(spatial domain)值, 則是頻域(frequency domain)值。
轉換之後的頻域值是複數, 因此,顯示傅立葉變換之後的結果需要使用實數影象(real image) 加虛數影象(complex image), 或者幅度影象(magitude image)加相點陣圖像(phase image)。 在實際的影象處理過程中,僅僅使用了幅度影象,因為幅度影象包含了原影象的幾乎所有我們需要的幾何資訊。然而,如果你想通過修改幅度影象或者相點陣圖像的方法來間接修改原空間影象,你需要使用逆傅立葉變換得到修改後的空間影象,這樣你就必須同時保留幅度影象和相點陣圖像了。
在此示例中,我將展示如何計算以及顯示傅立葉變換後的幅度影象。由於數字影象的離散性,畫素值的取值範圍也是有限的。比如在一張灰度影象中,畫素灰度值一般在0到255之間。 因此,我們這裡討論的也僅僅是離散傅立葉變換(DFT)。 如果你需要得到影象中的幾何結構資訊,那你就要用到它了。
在頻域裡面,對於一幅影象,高頻部分代表了影象的細節、紋理資訊;低頻部分代表了影象的輪廓資訊。如果對一幅精細的影象使用低通濾波器,那麼濾波後的結果就剩下了輪廓了。這與訊號處理的基本思想是相通的。如果影象受到的噪聲恰好位於某個特定的“頻率”範圍內,則可以通過濾波器來恢復原來的影象。傅立葉變換在影象處理中可以做到:影象增強與影象去噪,影象分割之邊緣檢測,影象特徵提取,影象壓縮等等。
1.2 傅立葉變換過程一系列函式
1 . 將影象延展到最佳尺寸(提高執行速度)
- getOptimalDFTSize():返回給定尺寸的傅立葉最優尺寸大小,提高執行速度(需要擴充影象,填充多少由此函式計算得到:被計算的數字序列長度vecsize為2的n次冪或者能夠分解成2,3,5的乘積)
- copyMakeBorder() 邊界擴充函式
2 . 為傅立葉變換的結果(實部和虛部)分配儲存空間. 傅立葉變換的結果是複數,這就是說對於每個原影象值,結果是兩個影象值。 此外,頻域值範圍遠遠超過空間值範圍, 因此至少要將頻域儲存在 float 格式中。 結果我們將輸入影象轉換成浮點型別,並多加一個額外通道來儲存複數部分
3 . 進行離散傅立葉變換. 支援影象原地計算 (輸入輸出為同一影象):
- dtf() :對一維或者二維浮點數陣列進行正向或反向傅立葉變換
4 . 將複數轉換為幅度複數包含實數部分(Re)和複數部分 (imaginary - Im)。 離散傅立葉變換的結果是複數,對應的幅度可以表示為:
- magnitude() 計算二維向量的幅值
5 . 對數尺度(logarithmic scale)縮放. 傅立葉變換的幅度值範圍大到不適合在螢幕上顯示。高值在螢幕上顯示為白點,而低值為黑點,高低值的變化無法有效分辨。為了在螢幕上凸顯出高低變化的連續性,我們可以用對數尺度來替換線性尺度:
- log() 自然對數函式
6 . 剪下和重分佈幅度圖象限.將新新增的畫素剔除。為了方便顯示,我們也可以重新分佈幅度圖象限位置(注:將第五步得到的幅度圖從中間劃開得到四張1/4子影象,將每張子影象看成幅度圖的一個象限,重新分佈即將四個角點重疊到圖片中心)。 這樣的話原點(0,0)就位移到影象中心。
7 . 歸一化. 將畫素值歸一到 float(0,1) 再乘以 255用於顯示 。
- normalize() 矩陣歸一化函式
cv2.getOptimalDFTSize(vecsize)
# vecsize: 傳入:image.shape[0]/image.shape[1]

cv2.copyMakeBorder(src,top,bottom,left,right,borderType,dst=None)
"""
	src:  影象
	top,bottom,left,right:  上/下/左/右邊擴充畫素(int)
	borderType: 邊界型別:
		BORDER_CONSTANT:   常量,增加的變數通通為value
		BORDER_REFLICATE:  直接用邊界的顏色填充,比如 : aaaaaa | abcdefgh | hhhhhhh
		BORDER_REFLECT:    映象:比如 : fedcba | abcdefgh | hgfedcb
		BORDER_REFLECT_101:倒映,和上面類似,但在倒映時,會把邊界空開:比如 : gfedcb | abcdefgh  |gfedcba
		BORDER_WRAP:       沒有規律的,比如: cdefgh | abcdefgh | abcdefg
"""
cv2.magnitude(InputArray x, InputArray y, OutPutArray magnitude)
"""
計算輸入矩陣x和y對應該的每個畫素平方求和後開根號儲存在輸出矩陣magnitude中。
"""
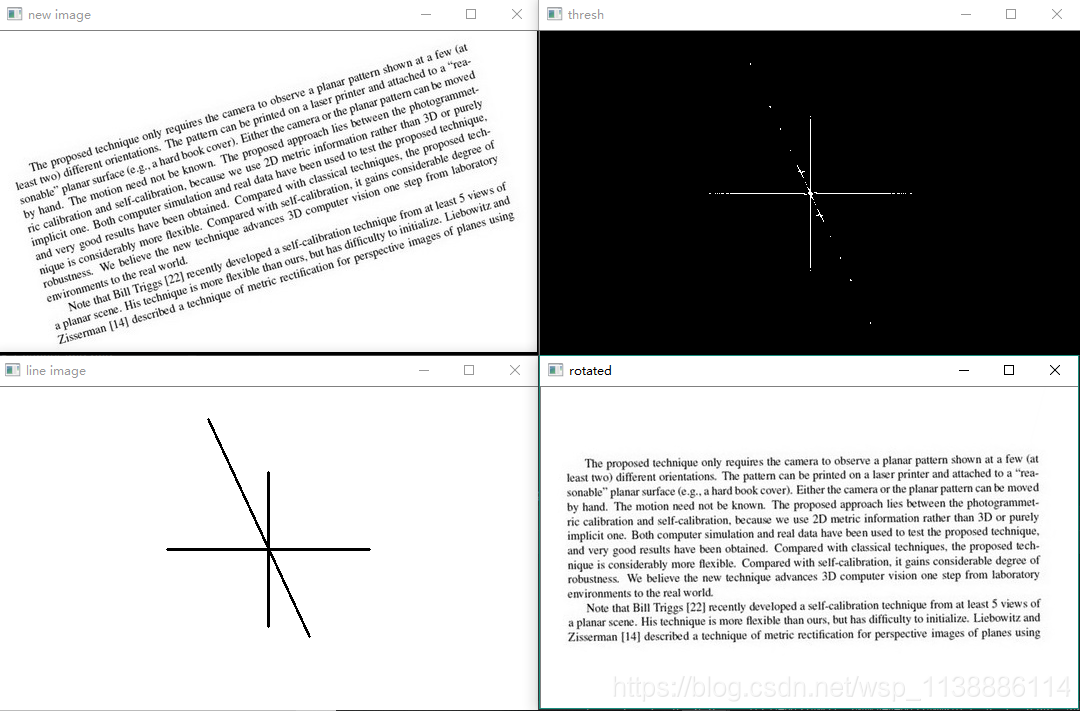
1.3 影象矯正處理流程
- 獲取影象的傅立葉變換圖
- 二值化
- Hough直線檢測
- 計算傾斜角度
- 旋轉校正
import cv2
import numpy as np
import math

def fourier_demo():
    #1、灰度化讀取檔案,
    img = cv2.imread('english_rotation.jpg',0)

    #2、影象延擴
    h, w = img.shape[:2]
    new_h = cv2.getOptimalDFTSize(h)
    new_w = cv2.getOptimalDFTSize(w)
    right = new_w - w
    bottom = new_h - h
    nimg = cv2.copyMakeBorder(img, 0, bottom, 0, right, borderType=cv2.BORDER_CONSTANT, value=0)
    cv2.imshow('new image', nimg)

    #3、執行傅立葉變換,並過得頻域影象
    f = np.fft.fft2(nimg)
    fshift = np.fft.fftshift(f)
    magnitude = np.log(np.abs(fshift))


    #二值化
    magnitude_uint = magnitude.astype(np.uint8)
    ret, thresh = cv2.threshold(magnitude_uint, 11, 255, cv2.THRESH_BINARY)
    print(ret)

    cv2.imshow('thresh', thresh)
    print(thresh.dtype)
    #霍夫直線變換
    lines = cv2.HoughLinesP(thresh, 2, np.pi/180, 30, minLineLength=40, maxLineGap=100)
    print(len(lines))

    #建立一個新影象,標註直線
    lineimg = np.ones(nimg.shape,dtype=np.uint8)
    lineimg = lineimg * 255

    piThresh = np.pi/180
    pi2 = np.pi/2
    print(piThresh)

    for line in lines:
        x1, y1, x2, y2 = line[0]
        cv2.line(lineimg, (x1, y1), (x2, y2), (0, 255, 0), 2)
        if x2 - x1 == 0:
            continue
        else:
            theta = (y2 - y1) / (x2 - x1)
        if abs(theta) < piThresh or abs(theta - pi2) < piThresh:
            continue
        else:
            print(theta)

    angle = math.atan(theta)
    print(angle)
    angle = angle * (180 / np.pi)
    print(angle)
    angle = (angle - 90)/(w/h)
    print(angle)

    center = (w//2, h//2)
    M = cv2.getRotationMatrix2D(center, angle, 1.0)
    rotated = cv2.warpAffine(img, M, (w, h), flags=cv2.INTER_CUBIC, borderMode=cv2.BORDER_REPLICATE)
    cv2.imshow('line image', lineimg)
    cv2.imshow('rotated', rotated)

fourier_demo()
cv2.waitKey(0)
cv2.destroyAllWindows()

二、旋轉影象矯正
影象旋轉校正思路如下
- 讀入,灰度化
- 高斯模糊
- 二值化影象
- 閉開運算
- 獲取影象頂點
- 旋轉矯正
import cv2
import numpy as np

def Img_Outline(input_dir):
    original_img = cv2.imread(input_dir)
    gray_img = cv2.cvtColor(original_img, cv2.COLOR_BGR2GRAY)
    blurred = cv2.GaussianBlur(gray_img, (9, 9), 0)                     # 高斯模糊去噪(設定卷積核大小影響效果)
    _, RedThresh = cv2.threshold(blurred, 165, 255, cv2.THRESH_BINARY)  # 設定閾值165(閾值影響開閉運算效果)
    kernel = cv2.getStructuringElement(cv2.MORPH_RECT, (5, 5))          # 定義矩形結構元素
    closed = cv2.morphologyEx(RedThresh, cv2.MORPH_CLOSE, kernel)       # 閉運算(連結塊)
    opened = cv2.morphologyEx(closed, cv2.MORPH_OPEN, kernel)           # 開運算(去噪點)
    return original_img, gray_img, RedThresh, closed, opened


def findContours_img(original_img, opened):
    image, contours, hierarchy = cv2.findContours(opened, cv2.RETR_LIST, cv2.CHAIN_APPROX_SIMPLE)
    c = sorted(contours, key=cv2.contourArea, reverse=True)[1]          # 計算最大輪廓的旋轉包圍盒
    rect = cv2.minAreaRect(c)
    angle = rect[2]
    print("angle",angle)
    box = np.int0(cv2.boxPoints(rect))
    draw_img = cv2.drawContours(original_img.copy(), [box], -1, (0, 0, 255), 3)
    rows, cols = original_img.shape[:2]
    M = cv2.getRotationMatrix2D((cols / 2, rows / 2), angle, 1)
    result_img = cv2.warpAffine(original_img, M, (cols, rows))
    return result_img,draw_img


if __name__ == "__main__":
    input_dir = "gongjiaoka.png"
    original_img, gray_img, RedThresh, closed, opened = Img_Outline(input_dir)
    result_img,draw_img = findContours_img(original_img,opened)

    cv2.imshow("original_img", original_img)
    cv2.imshow("gray_img", gray_img)
    cv2.imshow("RedThresh", RedThresh)
    cv2.imshow("Close", closed)
    cv2.imshow("Open", opened)
    cv2.imshow("draw_img", draw_img)
    cv2.imshow("result_img", result_img)
    cv2.waitKey(0)
    cv2.destroyAllWindows()

三、基於透視的影象矯正
3.1 直接變換
- 獲取影象四個頂點
- 形成變換矩陣
- 透視變換
import cv2
import numpy as np
import matplotlib.pyplot as plt
img = cv2.imread('original_img.jpg')
H_rows, W_cols= img.shape[:2]
print(H_rows, W_cols)

# 原圖中書本的四個角點(左上、右上、左下、右下),與變換後矩陣位置
pts1 = np.float32([[161, 80], [449, 12], [1, 430], [480, 394]])
pts2 = np.float32([[0, 0],[W_cols,0],[0, H_rows],[H_rows,W_cols],])

# 生成透視變換矩陣;進行透視變換
M = cv2.getPerspectiveTransform(pts1, pts2)
dst = cv2.warpPerspective(img, M, (500,470))

"""
註釋程式碼同效
# img[:, :, ::-1]是將BGR轉化為RGB
# plt.subplot(121), plt.imshow(img[:, :, ::-1]), plt.title('input')
# plt.subplot(122), plt.imshow(dst[:, :, ::-1]), plt.title('output')
# plt.show
"""

cv2.imshow("original_img",img)
cv2.imshow("result",dst)
cv2.waitKey(0)
cv2.destroyAllWindows()

3.2 自動獲取影象頂點變換
- 以灰度圖讀入
- 腐蝕膨脹,閉合等操作
- 二值化影象
- 獲取影象頂點
- 透視矯正
直接獲取影象輪廓矯正
該方法不具有普適性,只針對比較乾淨對比度高的影象,只提供一種思路
from imutils.perspective import four_point_transform
import imutils
import cv2

def Get_Outline(input_dir):
    image = cv2.imread(input_dir)
    gray = cv2.cvtColor(image, cv2.COLOR_BGR2GRAY)
    blurred = cv2.GaussianBlur(gray, (5,5),0)
    edged = cv2.Canny(blurred,75,200)
    return image,gray,edged

def Get_cnt(edged):
    cnts = cv2.findContours(edged.copy(), cv2.RETR_EXTERNAL,cv2.CHAIN_APPROX_SIMPLE)
    cnts = cnts[0] if  imutils.is_cv2()  else   cnts[1]
    docCnt =None

    if len(cnts) > 0:
        cnts =sorted(cnts,key=cv2.contourArea,reverse=True)
        for c in cnts:
            peri = cv2.arcLength(c,True)                   # 輪廓按大小降序排序
            approx = cv2.approxPolyDP(c,0.02 * peri,True)  # 獲取近似的輪廓
            if len(approx) ==4:                            # 近似輪廓有四個頂點
                docCnt = approx
                break
    return docCnt

if __name__=="__main__":
    input_dir = "gongjiaoka.png"
    image,gray,edged = Get_Outline(input_dir)
    docCnt = Get_cnt(edged)
    result_img = four_point_transform(image, docCnt.reshape(4,2)) # 對原始影象進行四點透視變換
    cv2.imshow("original", image)
    cv2.imshow("gray", gray)
    cv2.imshow("edged", edged)
    cv2.imshow("result_img", result_img)

    cv2.waitKey(0)
    cv2.destroyAllWindows()

獲取影象輪廓頂點矯正
import cv2
import math
import numpy as np

def Img_Outline(input_dir):
    original_img = cv2.imread(input_dir)
    gray_img = cv2.cvtColor(original_img, cv2.COLOR_BGR2GRAY)
    blurred = cv2.GaussianBlur(gray_img, (9, 9), 0)                     # 高斯模糊去噪(設定卷積核大小影響效果)
    _, RedThresh = cv2.threshold(blurred, 165, 255, cv2.THRESH_BINARY)  # 設定閾值165(閾值影響開閉運算效果)
    kernel = cv2.getStructuringElement(cv2.MORPH_RECT, (5, 5))          # 定義矩形結構元素
    closed = cv2.morphologyEx(RedThresh, cv2.MORPH_CLOSE, kernel)       # 閉運算(連結塊)
    opened = cv2.morphologyEx(closed, cv2.MORPH_OPEN, kernel)           # 開運算(去噪點)
    return original_img, gray_img, RedThresh, closed, opened


def findContours_img(original_img, opened):
    image, contours, hierarchy = cv2.findContours(opened, cv2.RETR_LIST, cv2.CHAIN_APPROX_SIMPLE)
    c = sorted(contours, key=cv2.contourArea, reverse=True)[1]   # 計算最大輪廓的旋轉包圍盒
    rect = cv2.minAreaRect(c)                                    # 獲取包圍盒(中心點,寬高,旋轉角度)
    box = np.int0(cv2.boxPoints(rect))                           # box
    draw_img = cv2.drawContours(original_img.copy(), [box], -1, (0, 0, 255), 3)

    print("box[0]:", box[0])
    print("box[1]:", box[1])
    print("box[2]:", box[2])
    print("box[3]:", box[3])
    return box,draw_img

d
