
Unity 編輯器擴充套件教程
來自:candycat1992
http://blog.csdn.net/candycat1992/article/details/52067975
寫在前面
Unity最強大的地方之一是它擴充套件性非常強的編輯器。Unite Europe 2016上有一個視訊專門講編輯器程式設計的:
這裡大概記錄一下里面的關鍵點。
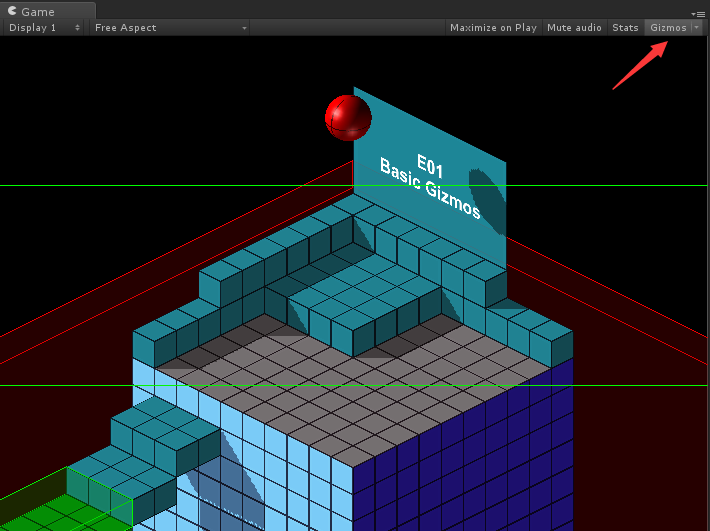
場景一
關注點:
- 繪製重要區域,Gizmos.DrawXXX
- OnDrawGizmos和OnDrawGizmosSelected回撥函式
- 點選Gizmos按鈕就可以在Game檢視也看到線框了
// OnDrawGizmos()會在編輯器的Scene檢視重新整理的時候被呼叫 - 1
- 2
- 3
- 4
- 5
- 6
- 7
- 8
- 9
- 10
- 11
- 12
- 13
- 14
- 15
- 16
- 17
- 18
- 19
- 20
場景二
關注點:
- 組織面板上的引數,新增滑動條、Header、空白等

    [Space( 10 )]
    public float MaximumHeight;
    public float MinimumHeight;

    [Header( "Safe Frame" )]
    [Range( 0f, 1f )]
    public float SafeFrameTop;
    [Range( 0f, 1f )]
public float SafeFrameBottom;- 1
- 2
- 3
- 4
- 5
- 6
- 7
- 8
- 9
注意到上面面板的最小面有個Camera Height,調節它可以改變攝像機的高度。這個改變是可以發生在編輯器模式下的,而且也不需要指令碼新增ExecuteInEditor。這是通過實現自定義的Editor指令碼來實現的:
using UnityEngine;
using UnityEditor;
using System.Collections;

// 我們可以通過為一個類定義它的Editor型別的[CustomEditor]來自定義該類的繪製介面
// 這需要把這個檔案放在Editor目錄下
[CustomEditor( typeof( GameCamera ) )]
public class GameCameraEditor : Editor
{
    GameCamera m_Target;

    // 過載OnInspectorGUI()來繪製自己的編輯器
    public override void OnInspectorGUI()
    {
        // target可以讓我們得到當前繪製的Component物件
        m_Target = (GameCamera)target;

        // DrawDefaultInspector告訴Unity按照預設的方式繪製面板,這種方法在我們僅僅想要自定義某幾個屬性的時候會很有用
        DrawDefaultInspector();
        DrawCameraHeightPreviewSlider();
    }

    void DrawCameraHeightPreviewSlider()
    {
        GUILayout.Space( 10 );

        Vector3 cameraPosition = m_Target.transform.position;
        cameraPosition.y = EditorGUILayout.Slider( "Camera Height", cameraPosition.y, m_Target.MinimumHeight, m_Target.MaximumHeight );

        if( cameraPosition.y != m_Target.transform.position.y )
        {
            // 改變狀態前,使用該方法來記錄操作,以便之後Undo
            Undo.RecordObject( m_Target, "Change Camera Height" );
            m_Target.transform.position = cameraPosition;
        }
    }
}- 1
- 2
- 3
- 4
- 5
- 6
- 7
- 8
- 9
- 10
- 11
- 12
- 13
- 14
- 15
- 16
- 17
- 18
- 19
- 20
- 21
- 22
- 23
- 24
- 25
- 26
- 27
- 28
- 29
- 30
- 31
- 32
- 33
- 34
- 35
- 36
- 37
場景三
關注點:
- 自定義繪製List物件
- 使用serializedObject來修改引數的話Unity會自動有各種幫助函式,例如自動新增Undo功能
- 如果直接修改引數的話,需要使用EditorUtility.SetDirty來告訴Unity需要儲存資料
- BeginChangeCheck()和EndChangeCheck()會檢測它們之間的GUI有沒有被修改,如果修改了的話可以據此修改引數
- Undo.RecordObject可以為下一步修改新增Undo/Redo
- EditorUtility.DisplayDialog可以開啟內建對話方塊
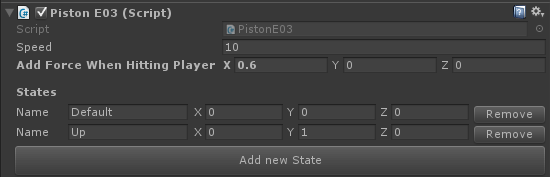
-
首先在面板上隱藏預設的List繪製方法,使用HideInInspector隱藏屬性:
public class PistonE03 : MonoBehaviour { public float Speed; public Vector3 AddForceWhenHittingPlayer; //We are hiding this in the inspector because we want to draw our own custom //inspector for it. [HideInInspector] public List<PistonState> States = new List<PistonState>(); ......- 1
- 2
- 3
- 4
- 5
- 6
- 7
- 8
- 9
- 10
-
為了讓PistonState可以顯示在面板上,需要序列化PistonState:
//[System.Serializable] tells unity to serialize this class if //it's used in a public array or as a public variable in a component [System.Serializable] public class PistonState { public string Name; public Vector3 Position; }- 1
- 2
- 3
- 4
- 5
- 6
- 7
- 8
-
實現自定義的繪製方程:
[CustomEditor( typeof( PistonE03 ) )] public class PistonE03Editor : Editor { PistonE03 m_Target; public override void OnInspectorGUI() { m_Target = (PistonE03)target; DrawDefaultInspector(); DrawStatesInspector(); } //Draw a beautiful and useful custom inspector for our states array void DrawStatesInspector() { GUILayout.Space( 5 ); GUILayout.Label( "States", EditorStyles.boldLabel ); for( int i = 0; i < m_Target.States.Count; ++i ) { DrawState( i ); } DrawAddStateButton(); }- 1
- 2
- 3
- 4
- 5
- 6
- 7
- 8
- 9
- 10
- 11
- 12
- 13
- 14
- 15
- 16
- 17
- 18
- 19
- 20
- 21
- 22
- 23
- 24
- 25
- 26
DrawDefaultInspector:先繪製預設的,DrawStatesInspector:自定義繪製面板函式。- 1
- 2
-
DrawState函式:
void DrawState( int index ) { if( index < 0 || index >= m_Target.States.Count ) { return; } // 在我們的serializedObject中找到States變數 // serializedObject允許我們方便地訪問和修改引數,Unity會提供一系列幫助函式。例如,我們可以通過serializedObject來修改元件值,而不是直接修改,Unity會自動建立Undo和Redo功能 SerializedProperty listIterator = serializedObject.FindProperty( "States" ); GUILayout.BeginHorizontal(); { // 如果是在例項化的prefab上修改引數,我們可以模仿Unity預設的途徑來讓修改過的而且未被Apply的值顯示成粗體 if( listIterator.isInstantiatedPrefab == true ) { //The SetBoldDefaultFont functionality is usually hidden from us but we can use some tricks to //access the method anyways. See the implementation of our own EditorGUIHelper.SetBoldDefaultFont //for more info EditorGUIHelper.SetBoldDefaultFont( listIterator.GetArrayElementAtIndex( index ).prefabOverride ); } GUILayout.Label( "Name", EditorStyles.label, GUILayout.Width( 50 ) ); // BeginChangeCheck()和EndChangeCheck()會檢測它們之間的GUI有沒有被修改 EditorGUI.BeginChangeCheck(); string newName = GUILayout.TextField( m_Target.States[ index ].Name, GUILayout.Width( 120 ) ); Vector3 newPosition = EditorGUILayout.Vector3Field( "", m_Target.States[ index ].Position ); // 如果修改了的話EndChangeCheck()就會返回true,此時我們就可以進行一些操作例如儲存變化的數值 if( EditorGUI.EndChangeCheck() ) { //Create an Undo/Redo step for this modification Undo.RecordObject( m_Target, "Modify State" ); m_Target.States[ index ].Name = newName; m_Target.States[ index ].Position = newPosition; // 如果我們直接修改屬性,而沒有通過serializedObject,那麼Unity並不會儲存這些資料,Unity只會儲存那些標識為dirty的屬性 EditorUtility.SetDirty( m_Target ); } EditorGUIHelper.SetBoldDefaultFont( false ); if( GUILayout.Button( "Remove" ) ) { EditorApplication.Beep(); // 可以很方便的顯示一個包含特定按鈕的對話方塊,例如是否同意刪除 if( EditorUtility.DisplayDialog( "Really?", "Do you really want to remove the state '" + m_Target.States[ index ].Name + "'?", "Yes", "No" ) == true ) { Undo.RecordObject( m_Target, "Delete State" ); m_Target.States.RemoveAt( index ); EditorUtility.SetDirty( m_Target ); } } } GUILayout.EndHorizontal();- 1
- 2
- 3
- 4
- 5
- 6
- 7
- 8
- 9
- 10
- 11
- 12
- 13
- 14
- 15
- 16
- 17
- 18
- 19
- 20
- 21
- 22
- 23
- 24
- 25
- 26
- 27
- 28
- 29
- 30
- 31
- 32
- 33
- 34
- 35
- 36
- 37
- 38
- 39
- 40
- 41
- 42
- 43
- 44
- 45
- 46
- 47
- 48
- 49
- 50
- 51
- 52
- 53
- 54
- 55
- 56
- 57
- 58
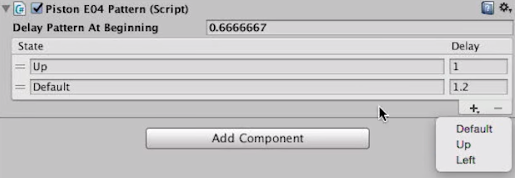
場景四
關注點:
- 可排序的陣列面板,通過使用ReorderableList來實現的,以及它的各個回撥函式
using UnityEngine;
using UnityEditor;
// UnityEditorInternal是Unity內部使用、還未開放給用使用者的一些庫,可能有一些很有意思的類,例如ReorderableList,但注意可能會隨著新版本發生變化
using UnityEditorInternal;
using System.Collections;

// CanEditMultipleObjects告訴Unity,當我們選擇同一種類型的多個元件時,我們自定義的面板是可以支援同時修改所有選中的元件的
// 如果我們在修改引數時使用的是serializedObject,那麼這個功能Unity會自動完成的
// 但如果我們是直接使用"target"來訪問和修改引數的話,這個變數只能訪問到選中的第一個元件
// 此時我們可以使用"targets"來得到所有選中的相同元件
[CanEditMultipleObjects]
[CustomEditor( typeof( PistonE04Pattern ) )]
public class PistonE04PatternEditor : Editor
{
    // UnityEditorInternal中提供了一種可排序的列表面板顯示類
    ReorderableList m_List;
    PistonE03 m_Piston;

    // OnEnable會在自定義面板被開啟的時候呼叫,例如當選中一個包含了PistonE04Pattern的gameobject時
    void OnEnable()
    {
        if( target == null )
        {
            return;
        }

        FindPistonComponent();
        CreateReorderableList();
        SetupReoirderableListHeaderDrawer();
        SetupReorderableListElementDrawer();
        SetupReorderableListOnAddDropdownCallback();
    }

    void FindPistonComponent()
    {
        m_Piston = ( target as PistonE04Pattern ).GetComponent<PistonE03>();
    }

    void CreateReorderableList()
    {
        // ReorderableList是一個非常棒的檢視陣列型別變數的實現類。它位於UnityEditorInternal中,這意味著Unity並沒有覺得該類足夠好到可以開放給公眾
        // 更多關於ReorderableLists的內容可參考:
        // http://va.lent.in/unity-make-your-lists-functional-with-reorderablelist/
        m_List = new ReorderableList(
                        serializedObject,
                        serializedObject.FindProperty( "Pattern" ),
                        true, true, true, true );
    }

    void SetupReoirderableListHeaderDrawer()
    {
        // ReorderableList有一系列回撥函式來讓我們過載繪製這些陣列
        // 這裡我們使用drawHeaderCallback來繪製表格的頭headers
        // 每個回撥會接受一個Rect變數,它包含了該元素繪製的位置
        // 因此我們可以使用這個變數來決定我們把當前的元素繪製在哪裡
        m_List.drawHeaderCallback =
            ( Rect rect ) =>
        {
            EditorGUI.LabelField(
                new Rect( rect.x, rect.y, rect.width - 60, rect.height ),
                "State" );
            EditorGUI.LabelField(
                new Rect( rect.x + rect.width - 60, rect.y, 60, rect.height ),
                "Delay" );
        };
    }

    void SetupReorderableListElementDrawer()
    {
        // drawElementCallback會定義列表中的每個元素是如何被繪製的
        // 同樣,保證我們繪製的元素是相對於Rect引數繪製的
        m_List.drawElementCallback =
            ( Rect rect, int index, bool isActive, bool isFocused ) =>
        {
            var element = m_List.serializedProperty.GetArrayElementAtIndex( index );
            rect.y += 2;

            float delayWidth = 60;
            float nameWidth = rect.width - delayWidth;

            EditorGUI.PropertyField(
                new Rect( rect.x, rect.y, nameWidth - 5, EditorGUIUtility.singleLineHeight ),
                element.FindPropertyRelative( "Name" ), GUIContent.none );

            EditorGUI.PropertyField(
                new Rect( rect.x + nameWidth, rect.y, delayWidth, EditorGUIUtility.singleLineHeight ),
                element.FindPropertyRelative( "DelayAfterwards" ), GUIContent.none );
        };
    }

    void SetupReorderableListOnAddDropdownCallback()
    {
        // onAddDropdownCallback定義當我們點選列表下面的[+]按鈕時發生的事件
        // 在本例裡,我們想要顯示一個下拉選單來給出預定義的一些States
        m_List.onAddDropdownCallback =
            ( Rect buttonRect, ReorderableList l ) =>
        {
            if( m_Piston.States == null || m_Piston.States.Count == 0 )
            {
                EditorApplication.Beep();
                EditorUtility.DisplayDialog( "Error", "You don't have any states defined in the PistonE03 component", "Ok" );
                return;
            }

            var menu = new GenericMenu();

            foreach( PistonState state in m_Piston.States )
            {
                menu.AddItem( new GUIContent( state.Name ),
                              false,
                              OnReorderableListAddDropdownClick,
                              state );
            }

            menu.ShowAsContext();
        };
    }

    // 這個回撥函式會在使用者選擇了[+]下拉選單中的某一項後呼叫
    void OnReorderableListAddDropdownClick( object target )
    {
        PistonState state = (PistonState)target;

        int index = m_List.serializedProperty.arraySize;
        m_List.serializedProperty.arraySize++;
        m_List.index = index;

        SerializedProperty element = m_List.serializedProperty.GetArrayElementAtIndex( index );
        element.FindPropertyRelative( "Name" ).stringValue = state.Name;
        element.FindPropertyRelative( "DelayAfterwards" ).floatValue = 0f;

        serializedObject.ApplyModifiedProperties();
    }

    public override void OnInspectorGUI()
    {
        GUILayout.Space( 5 );

        EditorGUILayout.PropertyField( serializedObject.FindProperty( "DelayPatternAtBeginning" ) );

        serializedObject.ApplyModifiedProperties();
        serializedObject.Update();

        m_List.DoLayoutList();
        serializedObject.ApplyModifiedProperties();
    }
}- 1
- 2
- 3
- 4
- 5
- 6
- 7
- 8
- 9
- 10 <
相關推薦
Unity 編輯器擴充套件教程
來自:candycat1992 http://blog.csdn.net/candycat1992/article/details/52067975 寫在前面 Unity最強大的地方之一是它擴充套件性非常強的編輯器。Unite Europe 20
Unity 編輯器擴充套件總結 一:編輯器開發入門
編輯器擴充套件總結 工欲善其事必先利其器 引言: 在專案開發中,編輯器擴充套件為開發者提供了開發自定義工具的功能,讓開發者更加便利地使用編輯器開發專案。近期小生一直在學習編輯器擴充套件的知識,發現網路上關於編輯器知識點的部落格較為零散且混亂。當然,有一些大佬已經總結的很
unity編輯器擴充套件#2 GUILayout、EditorGUILayout 控制元件整理
GUILayout 裝飾類控制元件: GUILayout.FlexibleSpace(); GUILayout.Space(100);//空格,沒什麼好說的 GUILayout.Label("label"); GUILayout.Box(new GUICo
unity編輯器擴充套件#1 自定義視窗、面板、和屬性
擼一遍unity官方文件的給的三個案例:https://docs.unity3d.com/2017.4/Documentation/Manual/editor-EditorWindows.html 自定義視窗 首先,要注意和編輯器相關的指令碼都應該把放到Editor資料夾裡,可以有多個E
Unity編輯器擴充套件:如何把asset 格式的資源轉成png
Assets Store 上提供了大量的優秀素材給開發者使用,包括模型貼圖UI音樂等等。但是一些上傳者可能出於特殊原因,上傳的素材格式是unity內建的.asset 格式,這樣的格式對於直接拿來在unity中使用的開發者當然沒有影響,但是遇到素材本身不是完全符合需求,需要做一些修
Unity編輯器擴充套件:如何把圖集(Atlas)拆分成單個圖片
遊戲開發中可能會用到商店下載的圖集,但是如果只是用到一部分,卻把整個圖集打包到專案則明顯是不划算的。可以讓美術同事單獨把需要的圖片切出來,但是圖源比較多的話也是一個不小的工作。既然能夠拿到切好的圖集資料,是不是可以通過程式碼自動生成切好的小圖呢,答案當然是肯定的。這裡提供一個小工具,操作
Unity編輯器擴充套件
(我們自己寫的指令碼放在 Editor檔案裡(Editor 自己建立 跟建立Scenes檔案一樣))1 增加簡單選單欄(第一排選單欄)(我們使用靜態方法便於呼叫 不用靜態方法 我們Unity不能顯示出來)public Class Tools { [Menu
unity編輯器 擴充套件之 快捷鍵寫法與意義
using UnityEngine; using System.Collections; // using UnityEditor;<span style="white-space:pre"&
Unity編輯器擴充套件-選單項
Unity編輯器允許你去新增像內建選單一樣外觀和行為的自定義選單。自定義選單對於那些經常使用的功能提供一種能從編輯器直接訪問的便捷方式。在這一課程中我將對每個描述的主題提供真實的使用示例,用於說明在unity中的選單項是如何建立和使用的。 新增選單項 為了要在頂層工具
Unity編輯器擴充套件學習筆記(一)——新增選單選項
以前一直沒用到編輯器擴充套件這一塊,上一次用還是當初在培訓機構老師教編寫打包工具的時候,那時候剛接觸unity聽不大懂也不知道幹啥用。轉眼就過去了好久。 最近遇到一些情況,有時候需要修改多個GameObject身上的屬性,有時候需要按照規律建立多個GameObject,這些
Unity 編輯器擴充套件 場景檢視內控制物件
using UnityEngine;using UnityEditor; [CustomEditor(typeof(EnemySpawn))]public class EnemySpawnEditor : Editor { void OnSceneGUI() { EnemySp
Unity 編輯器擴充套件
Unity編輯器擴充套件 1 在工程目錄下新建 Editor 資料夾 Editor資料夾內的資源都不會被打包出去(包括PC 移動端等 只會在unity的編輯器模式執行) //正常的新增選單欄 [MenuItem("Tools/test")]
Unity 編輯器擴充套件,讓開發更加快捷
在unity開發中經常會對資源或者指令碼進行批量處理,開發自己的工具可以加快處理的速度。當然有的地方必須要用到編輯器類,例如資源打包的時候需要觸發,這時候就用到了。 1.MeuItam函式的使用,如下;當編輯器沒有你自定義的根選項時編輯器會新建一個選項,例如Too
【Unity編輯器擴充套件簡介】儲存資料
unity編輯器中有三種方式可以儲存資料。 EditorPrefs EditorPrefs可以在PC中儲存共享資料,即不受制於專案地儲存資訊 影響範圍 儲存的值會影響每一個大版本的Unity編輯器 以前儲存在Unity4.x的值只能在Unity 4
Unity編輯器擴充套件(音效控制面板,路徑增刪)
using UnityEngine;using UnityEditor;using System.Collections.Generic;using System.Text;using System.IO;public class MusicWindowEditor : Ed
unity-編輯器擴充套件
unity編輯器擴充套件很方便,可以省掉很多製作其他工具的時間(比如技能編輯器,特效編輯器等,都是資料結構的匯入匯出) 可以直接在 Scene 、Inspector 或者新建一個 Window 中編輯 1、Inspector
Unity - 編輯器擴充套件
# 前言 對於Unity編輯器的擴充套件方法眾多,本文從最常用的一些方法入手,例如Inspector指令碼欄的擴充套件、頂選單欄的擴充套件等,圖文並茂闡述其完整用法。 本文大部分內容整理自 [獨立遊戲開發 - indienova](https://indienova.com/u/dev) 所著的 **Uni
unity編輯器擴充套件學習
擴充套件編輯器實際上就是在unity選單欄中新增一些按鈕,可以一鍵執行一些重複性的工作。 一.新增按鈕 1.簡單使用MenuItem特性 using UnityEngine; using UnityEditor; public class Tools { [MenuItem("Tools/test
Unity 3D編輯器擴充套件介紹、教程(一) —— 建立選單項
Unity編輯器擴充套件教程 本文提供全流程,中文翻譯。Chinar堅持將簡單的生活方式,帶給世人!(擁有更好的閱讀體驗 —— 高解析度使用者請根據需求調整網頁縮放比例)
unity 編輯器 ---獲取unity編輯器中的所有視窗,並開啟顯示,以備後面編輯器擴充套件
獲取原理:unity 所有視窗介面都繼承自編輯器UnityEditor程式集下的EditorWindow。而所有的編輯器視窗都在UnityEditor程式集裡定義,所以,我們通過反射獲取UnityEditor程式集獲取所有視窗就可以了。 直接上程式碼: using System; using