android自定義控制元件(七) onMeasure() 測量尺寸
阿新 • • 發佈:2019-01-26
上次講的自定義控制元件重新整理點螢幕的任意地方都會重新整理,而且在xml裡自定義控制元件下面放一個textview的話,這個TextView是顯示不出來的,不只這個,以前的幾個自定義控制元件都是
為什麼呢?今天來講下onMeasure()
在自定義重新整理控制元件的基礎上重寫onMeasure方法
根據上一篇自定義元件修改
註釋在程式碼裡
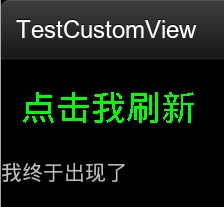
<LinearLayout xmlns:android="http://schemas.android.com/apk/res/android"
    android:orientation="vertical"
    android:layout_width="fill_parent"
    android:layout_height="wrap_content"
    >
	<xue.test.CusView3
		android:id="@+id/cusview3"
		android:layout_width="wrap_content"
		android:layout_height="wrap_content"
		>
	</xue.test.CusView3>
	<TextView
	   android:layout_width="wrap_content"
	   android:layout_height="wrap_content"
	   android:text="我終於出現了" />
</LinearLayout>
這裡的TextView無法顯示,想要顯示的話,要測量控制元件的大小
效果圖public class CusView3 extends View { private int color = 0; private String text = "點選我重新整理"; private Paint mPaint; private int mAscent; public CusView3(Context context, AttributeSet attrs) { super(context, attrs); mPaint = new Paint(); mPaint.setStyle(Style.FILL); mPaint.setTextSize(35.0f); setPadding(20, 60, 0, 0); //設定padding } @Override protected void onDraw(Canvas canvas) { super.onDraw(canvas); if (color > 2) { color = 0; } switch (color) { case 0: mPaint.setColor(Color.GREEN); break; case 1: mPaint.setColor(Color.RED); break; case 2: mPaint.setColor(Color.BLUE); break; default: break; } canvas.drawText(text, getPaddingLeft(), getPaddingTop(), mPaint); } public void changeColor() { color++; } /** * 比onDraw先執行 * * 一個MeasureSpec封裝了父佈局傳遞給子佈局的佈局要求,每個MeasureSpec代表了一組寬度和高度的要求。 * 一個MeasureSpec由大小和模式組成 * 它有三種模式:UNSPECIFIED(未指定),父元素部隊自元素施加任何束縛,子元素可以得到任意想要的大小; * EXACTLY(完全),父元素決定自元素的確切大小,子元素將被限定在給定的邊界裡而忽略它本身大小; * AT_MOST(至多),子元素至多達到指定大小的值。 * * 它常用的三個函式: * 1.static int getMode(int measureSpec):根據提供的測量值(格式)提取模式(上述三個模式之一) * 2.static int getSize(int measureSpec):根據提供的測量值(格式)提取大小值(這個大小也就是我們通常所說的大小) * 3.static int makeMeasureSpec(int size,int mode):根據提供的大小值和模式建立一個測量值(格式) */ @Override protected void onMeasure(int widthMeasureSpec, int heightMeasureSpec) { setMeasuredDimension(measureWidth(widthMeasureSpec), measureHeight(heightMeasureSpec)); } private int measureWidth(int measureSpec) { int result = 0; int specMode = MeasureSpec.getMode(measureSpec); int specSize = MeasureSpec.getSize(measureSpec); if (specMode == MeasureSpec.EXACTLY) { // We were told how big to be result = specSize; } else { // Measure the text result = (int) mPaint.measureText(text) + getPaddingLeft() + getPaddingRight(); if (specMode == MeasureSpec.AT_MOST) { // Respect AT_MOST value if that was what is called for by // measureSpec result = Math.min(result, specSize);// 60,480 } } return result; } private int measureHeight(int measureSpec) { int result = 0; int specMode = MeasureSpec.getMode(measureSpec); int specSize = MeasureSpec.getSize(measureSpec); mAscent = (int) mPaint.ascent(); if (specMode == MeasureSpec.EXACTLY) { // We were told how big to be result = specSize; } else { // Measure the text (beware: ascent is a negative number) result = (int) (-mAscent + mPaint.descent()) + getPaddingTop() + getPaddingBottom(); if (specMode == MeasureSpec.AT_MOST) { // Respect AT_MOST value if that was what is called for by // measureSpec result = Math.min(result, specSize); } } return result; } }