
3D鐳射雷達地面-非地面分割和pcl_ros實踐
部落格轉載自:https://blog.csdn.net/AdamShan/article/details/82901295
PCL基本入門
PCL是一個開源的點雲處理庫,是在吸收了前人點雲相關研究基礎上建立起來的大型跨平臺開源C++程式設計庫,它實現了大量點雲相關的通用演算法和高效資料結構,包含點雲獲取、濾波、分割、配準、檢索、特徵提取、識別、追蹤、曲面重建、視覺化等大量開原始碼。支援多種作業系統平臺,可在Windows、Linux、Android、Mac OS X、部分嵌入式實時系統上執行。如果說OpenCV是2D資訊獲取與處理的結晶,那麼PCL就在3D資訊獲取與處理上具有同等地位。ROS kinetic完整版中本身已經包含了pcl庫,同時ROS自帶的pcl_ros 包可以連線ROS和PCL庫。我們從一個簡單的Voxel Grid Filter的ROS節點實現來了解一下PCL在ROS中的基本用法,同時瞭解PCL中的一些基本資料結構:
在ROS專案中引入PCL庫
在此我們假定讀者已經自行安裝好ROS kinetic 的完整版,首先在我們的catkin workspace中新建一個package,我們將它命名為pcl_test,可以通過如下指令生成workspace和package:
cd ~
mkdir -p pcl_ws/src
cd pcl_ws
catkin_make
source devel/setup.bash
cd src
catkin_create_pkg pcl_test roscpp sensor_msgs pcl_ros
這樣,我們就新建了一個workspace,用於學習PCL,同時新建了一個名為pcl_test的package,這個ROS包依賴於roscpp,sensor_msgs, pcl_ros這幾個包,我們修改pcl_test包下的CMakeList檔案以及package.xml配置檔案,如下:
package.xml 檔案:
<?xml version="1.0"?>
<package>
  <name>pcl_test</name>
  <version>0.0.1</version>
  <description>The pcl_test package</description>
  <maintainer email="[email protected]">adam</maintainer>
  <license>MIT</license>

  <buildtool_depend>catkin</buildtool_depend>
  <build_depend>roscpp</build_depend>
  <build_depend>sensor_msgs</build_depend>
  <build_depend>pcl_ros</build_depend>

  <run_depend>roscpp</run_depend>
  <run_depend>sensor_msgs</run_depend>
  <run_depend>pcl_ros</run_depend>
</package>
CMakeList.txt 檔案:
cmake_minimum_required(VERSION 2.8.3)
project(pcl_test)

add_compile_options(-std=c++11)

find_package(catkin REQUIRED COMPONENTS
pcl_ros
roscpp
sensor_msgs
)

catkin_package(
  INCLUDE_DIRS include
  CATKIN_DEPENDS roscpp sensor_msgs pcl_ros
)

include_directories(
 include
 ${catkin_INCLUDE_DIRS}
)
link_directories(${PCL_LIBRARY_DIRS})

add_executable(${PROJECT_NAME}_node src/pcl_test_node.cpp src/pcl_test_core.cpp)

target_link_libraries(${PROJECT_NAME}_node
  ${catkin_LIBRARIES}
  ${PCL_LIBRARIES}
)
package.xml的內容很簡單,實際上就是這個包的描述檔案,build_depend 和 run_depend 兩個描述符分別指定了程式包編譯和執行的依賴項,通常是所用到的庫檔案的名稱。在這裡我們指定了三個編譯和執行時依賴項,分別是roscpp(編寫C++ ROS節點),sensor_msgs(定義了鐳射雷達的msg),pcl_ros(連線ROS和pcl庫)。
同樣的,在CMakeList中,我們通過find_package查詢這三個包的路徑,然後將三個包新增到 CATKIN_DEPENDS, 在使用pcl庫前,需要將PCL庫的路徑連結,通過link_directories(${PCL_LIBRARY_DIRS})來完成,並在最後的target_link_libraries中新增${PCL_LIBRARIES}。
編寫節點進行Voxel Grid Filter
接著我們在pcl_test/src目錄下新建pcl_test_node.cpp檔案:
#include "pcl_test_core.h"

int main(int argc, char **argv)
{
    ros::init(argc, argv, "pcl_test");

    ros::NodeHandle nh;

    PclTestCore core(nh);
    return 0;
}
此檔案僅包含main函式,是節點的入口,編寫標頭檔案include/pcl_test_core.h:
#pragma once

#include <ros/ros.h>

#include <pcl_conversions/pcl_conversions.h>
#include <pcl/point_types.h>
#include <pcl/conversions.h>
#include <pcl_ros/transforms.h>

#include <pcl/filters/voxel_grid.h>

#include <sensor_msgs/PointCloud2.h>

class PclTestCore
{

  private:
    ros::Subscriber sub_point_cloud_;

    ros::Publisher pub_filtered_points_;

    void point_cb(const sensor_msgs::PointCloud2ConstPtr& in_cloud);

  public:
    PclTestCore(ros::NodeHandle &nh);
    ~PclTestCore();
    void Spin();
};
以及pcl_test_core.cpp:
#include "pcl_test_core.h"

PclTestCore::PclTestCore(ros::NodeHandle &nh){
    sub_point_cloud_ = nh.subscribe("/velodyne_points",10, &PclTestCore::point_cb, this);

    pub_filtered_points_ = nh.advertise<sensor_msgs::PointCloud2>("/filtered_points", 10);

    ros::spin();
}

PclTestCore::~PclTestCore(){}

void PclTestCore::Spin(){

}

void PclTestCore::point_cb(const sensor_msgs::PointCloud2ConstPtr & in_cloud_ptr){
    pcl::PointCloud<pcl::PointXYZI>::Ptr current_pc_ptr(new pcl::PointCloud<pcl::PointXYZI>);
    pcl::PointCloud<pcl::PointXYZI>::Ptr filtered_pc_ptr(new pcl::PointCloud<pcl::PointXYZI>);

    pcl::fromROSMsg(*in_cloud_ptr, *current_pc_ptr);

    pcl::VoxelGrid<pcl::PointXYZI> vg;

    vg.setInputCloud(current_pc_ptr);
    vg.setLeafSize(0.2f, 0.2f, 0.2f);
    vg.filter(*filtered_pc_ptr);

    sensor_msgs::PointCloud2 pub_pc;
    pcl::toROSMsg(*filtered_pc_ptr, pub_pc);

    pub_pc.header = in_cloud_ptr->header;

    pub_filtered_points_.publish(pub_pc);
}
這個節點的功能是訂閱來自/velodyne_points話題的點雲資料,使用PCL內建的Voxel Grid Filter對原始的點雲進行降取樣,將降取樣的結果釋出到/filtered_points話題上。我們重點看回調函式PclTestCore::point_cb,在該回調函式中,我們首先定義了兩個點雲指標,在PCL庫中,pcl::PointCloud<T>是最基本的一種資料結構,它表示一塊點雲資料(點的集合),我們可以指定點的資料結構,在上述例項中,採用了pcl::PointXYZI這種型別的點。pcl::PointXYZI結構體使用(x, y, z, intensity)這四個數值來描述一個三維度空間點。
intensity,即反射強度,是指鐳射雷達的鐳射發射器發射鐳射後收到的反射的強度,通常所說的16線,32線鐳射雷達,其內部實際是並列縱排的多個鐳射發射器,通過電機自旋,產生360環視的點雲資料,不同顏色的物體對鐳射的反射強度也是不同的,通常來說,白色物體的反射強度(intensity)最強,對應的,黑色的反射強度最弱。
通常使用sensor_msgs/PointCloud2.h 做為點雲資料的訊息格式,可使用pcl::fromROSMsg和pcl::toROSMsg將sensor_msgs::PointCloud2與pcl::PointCloud<T>進行轉換。
為了使用Voxel Grid Filter對原始點雲進行降取樣,只需定義pcl::VocelGrid並且指定輸入點雲和leaf size,在本例中,我們使用leaf size為 0.2。Voxel Grid Filter將輸入點雲使用0.2m*0.2m*0.2m的立方體進行分割,使用小立方體的 形心(centroid) 來表示這個立方體的所有點,保留這些點作為降取樣的輸出。
驗證效果
我們寫一個launch檔案pcl_test.launch來啟動這個節點:
<launch>
    <node pkg="pcl_test" type="pcl_test_node" name="pcl_test_node" output="screen"/>
</launch>
回到workspace 目錄,使用catkin_make 編譯:
catkin_make
啟動這個節點:
roslaunch pcl_test pcl_test.launch
新建終端,並執行我們的測試bag(測試bag下載連結:https://pan.baidu.com/s/1HOhs9StXUmZ_5sCALgKG3w)
rosbag play --clock test.bag
開啟第三個終端,啟動Rviz
rosrun rviz rviz
配置Rviz的Frame為velodyne,並且載入原始點雲和過濾以後的點雲的display

原始點雲:
降取樣之後的點雲(即我們的節點的輸出):
點雲地面過濾
過濾地面是鐳射雷達感知中一步基礎的預處理操作,因為我們環境感知通常只對路面上的障礙物感興趣,且地面的點對於障礙物聚類容易產生影響,所以在做Lidar Obstacle Detection之前通常將地面點和非地面點進行分離。在此文中我們介紹一種被稱為Ray Ground Filter的路面過濾方法,並且在ROS中實踐。
對點雲剪裁和過濾
要分割地面和非地面,那麼過高的區域首先就可以忽略不計,我們先對點雲進行高度的裁剪。我們實驗用的bag在錄製的時候lidar的高度約為1.78米,我們剪裁掉1.28米以上的部分,程式碼如下:
void PclTestCore::clip_above(double clip_height, const pcl::PointCloud<pcl::PointXYZI>::Ptr in,
                             const pcl::PointCloud<pcl::PointXYZI>::Ptr out)
{
    pcl::ExtractIndices<pcl::PointXYZI> cliper;

    cliper.setInputCloud(in);
    pcl::PointIndices indices;
#pragma omp for
    for (size_t i = 0; i < in->points.size(); i++)
    {
        if (in->points[i].z > clip_height)
        {
            indices.indices.push_back(i);
        }
    }
    cliper.setIndices(boost::make_shared<pcl::PointIndices>(indices));
    cliper.setNegative(true); //ture to remove the indices
    cliper.filter(*out);
}
為了消除車身自身的雷達反射的影響,我們對近距離的點雲進行過濾,仍然使用pcl::ExtractIndices進行剪裁:
void PclTestCore::remove_close_pt(double min_distance, const pcl::PointCloud<pcl::PointXYZI>::Ptr in,
                                  const pcl::PointCloud<pcl::PointXYZI>::Ptr out)
{
    pcl::ExtractIndices<pcl::PointXYZI> cliper;

    cliper.setInputCloud(in);
    pcl::PointIndices indices;
#pragma omp for
    for (size_t i = 0; i < in->points.size(); i++)
    {
        double distance = sqrt(in->points[i].x*in->points[i].x + in->points[i].y*in->points[i].y);

        if (distance < min_distance)
        {
            indices.indices.push_back(i);
        }
    }
    cliper.setIndices(boost::make_shared<pcl::PointIndices>(indices));
    cliper.setNegative(true); //ture to remove the indices
    cliper.filter(*out);
}
其中,#pragma omp for語法OpenMP的並行化語法,即希望通過OpenMP並行化執行這條語句後的for迴圈,從而起到加速的效果。
角度微分和地面/非地面判斷
Ray Ground Filter演算法的核心是以射線(Ray)的形式來組織點雲。我們現在將點雲的 (x, y, z)三維空間降到(x,y)平面來看,計算每一個點到車輛x正方向的平面夾角 θ \thetaθ, 我們對360度進行微分,分成若干等份,每一份的角度為0.18度,這個微分的等份近似的可以看作一條射線,如下圖所示,圖中是一個鐳射雷達的縱截面的示意圖,雷達由下至上分佈多個鐳射器,發出如圖所示的放射狀鐳射束,這些鐳射束在平地上即表現為,圖中的水平線即為一條射線: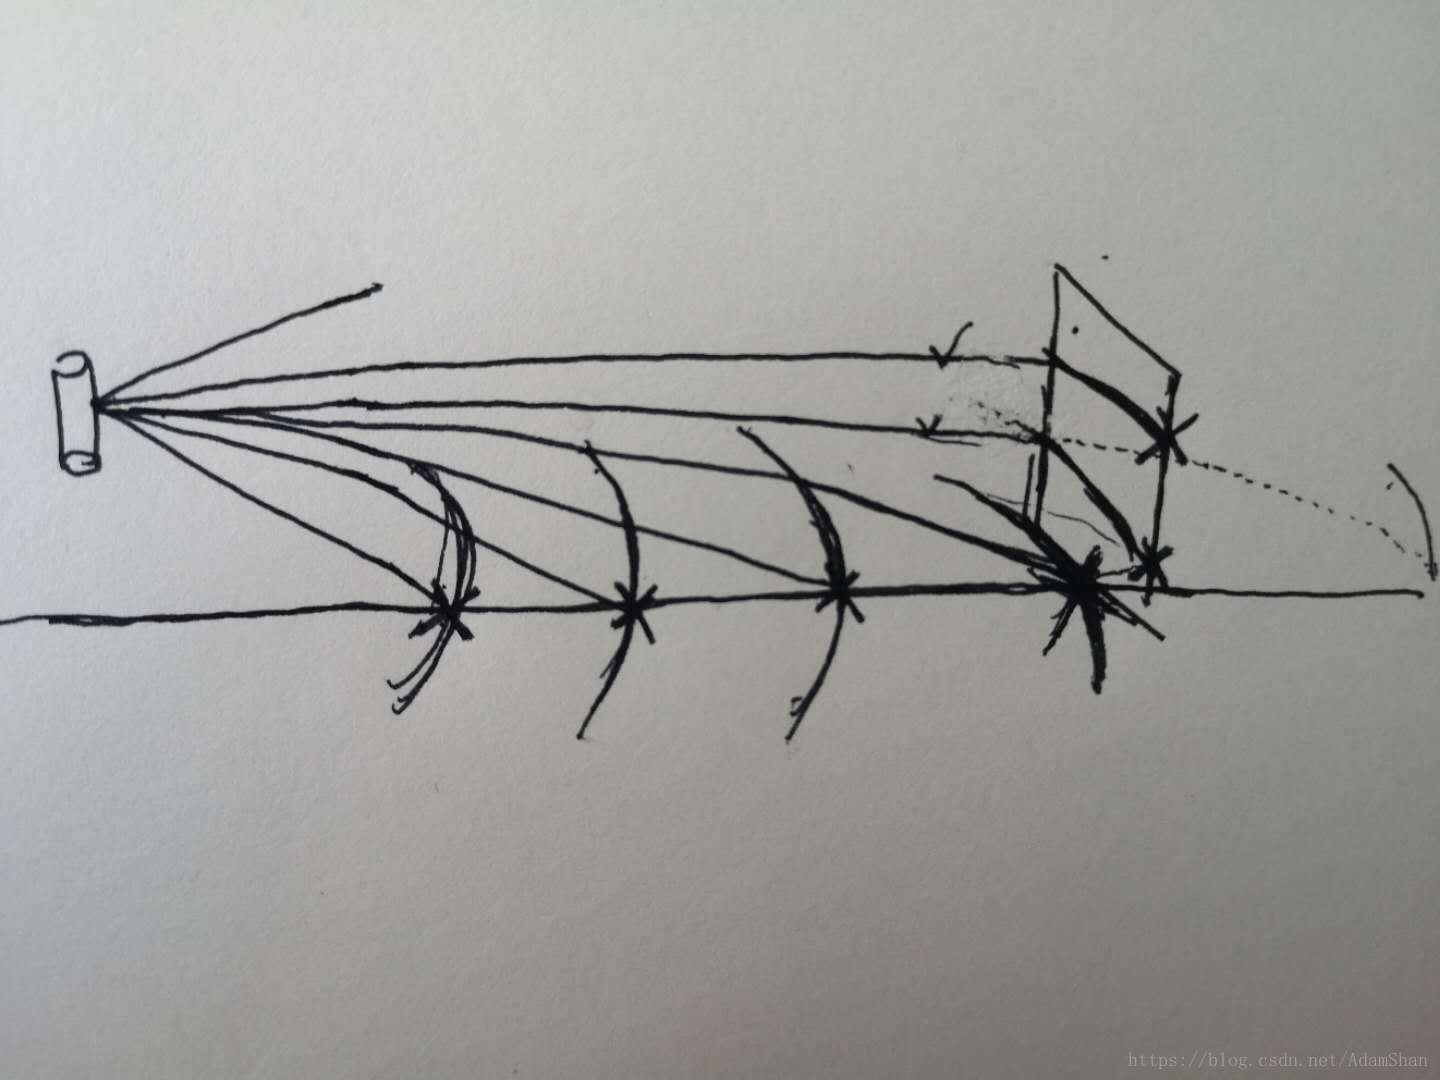
0.18度是VLP32C雷達的水平光束髮散間隔。
為了方便地對點進行半徑和夾角的表示,我們使用如下資料結構代替pcl::PointCloudXYZI:
  struct PointXYZIRTColor
  {
    pcl::PointXYZI point;

    float radius; //cylindric coords on XY Plane
    float theta;  //angle deg on XY plane

    size_t radial_div;     //index of the radial divsion to which this point belongs to
    size_t concentric_div; //index of the concentric division to which this points belongs to

    size_t original_index; //index of this point in the source pointcloud
  };
  typedef std::vector<PointXYZIRTColor> PointCloudXYZIRTColor;
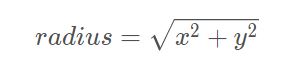
其中,radius表示點到lidar的水平距離(半徑),即:
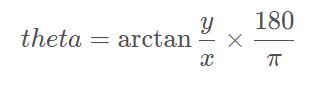
theta是點相對於車頭正方向(即x方向)的夾角,計算公式為:
我們用radial_div和concentric_div分別描述角度微分和距離微分。對點雲進行水平角度微分之後,可得到:3600/0.18=2000 條射線,將這些射線中的點按照距離的遠近進行排序,如下所示:
//將同一根射線上的點按照半徑(距離)排序
#pragma omp for
for (size_t i = 0; i < radial_dividers_num_; i++)
{
  std::sort(out_radial_ordered_clouds[i].begin(), out_radial_ordered_clouds[i].end(),[](const PointXYZIRTColor &a, const PointXYZIRTColor &b) { return a.radius < b.radius; });
}
通過判斷射線中前後兩點的坡度是否大於我們事先設定的坡度閾值,從而判斷點是否為地面點。程式碼如下:
void PclTestCore::classify_pc(std::vector<PointCloudXYZIRTColor> &in_radial_ordered_clouds,
                              pcl::PointIndices &out_ground_indices,
                              pcl::PointIndices &out_no_ground_indices)
{
    out_ground_indices.indices.clear();
    out_no_ground_indices.indices.clear();
#pragma omp for
    for (size_t i = 0; i < in_radial_ordered_clouds.size(); i++) //sweep through each radial division 遍歷每一根射線
    {
        float prev_radius = 0.f;
        float prev_height = -SENSOR_HEIGHT;
        bool prev_ground = false;
        bool current_ground = false;
        for (size_t j = 0; j < in_radial_ordered_clouds[i].size(); j++) //loop through each point in the radial div
        {
            float points_distance = in_radial_ordered_clouds[i][j].radius - prev_radius;
            float height_threshold = tan(DEG2RAD(local_max_slope_)) * points_distance;
            float current_height = in_radial_ordered_clouds[i][j].point.z;
            float general_height_threshold = tan(DEG2RAD(general_max_slope_)) * in_radial_ordered_clouds[i][j].radius;

            //for points which are very close causing the height threshold to be tiny, set a minimum value
            if (points_distance > concentric_divider_distance_ && height_threshold < min_height_threshold_)
            {
                height_threshold = min_height_threshold_;
            }

            //check current point height against the LOCAL threshold (previous point)
            if (current_height <= (prev_height + height_threshold) && current_height >= (prev_height - height_threshold))
            {
                //Check again using general geometry (radius from origin) if previous points wasn't ground
                if (!prev_ground)
                {
                    if (current_height <= (-SENSOR_HEIGHT + general_height_threshold) && current_height >= (-SENSOR_HEIGHT - general_height_threshold))
                    {
                        current_ground = true;
                    }
                    else
                    {
                        current_ground = false;
                    }
                }
                else
                {
                    current_ground = true;
                }
            }
            else
            {
                //check if previous point is too far from previous one, if so classify again
                if (points_distance > reclass_distance_threshold_ &&
                    (current_height <= (-SENSOR_HEIGHT + height_threshold) && current_height >= (-SENSOR_HEIGHT - height_threshold)))
                {
                    current_ground = true;
                }
                else
                {
                    current_ground = false;
                }
            }

            if (current_ground)
            {
                out_ground_indices.indices.push_back(in_radial_ordered_clouds[i][j].original_index);
                prev_ground = true;
            }
            else
            {
                out_no_ground_indices.indices.push_back(in_radial_ordered_clouds[i][j].original_index);
                prev_ground = false;
            }

            prev_radius = in_radial_ordered_clouds[i][j].radius;
            prev_height = in_radial_ordered_clouds[i][j].point.z;
        }
    }
}
這裡有兩個重要引數,一個是local_max_slope_,是我們設定的同條射線上鄰近兩點的坡度閾值,一個是general_max_slope_,表示整個地面的坡度閾值,這兩個坡度閾值的單位為度(degree),我們通過這兩個坡度閾值以及當前點的半徑(到lidar的水平距離)求得高度閾值,通過判斷當前點的高度(即點的z值)是否在地面加減高度閾值範圍內來判斷當前點是為地面。
在地面判斷條件中,current_height <= (-SENSOR_HEIGHT + general_height_threshold) && current_height >= (-SENSOR_HEIGHT - general_height_threshold) 中SENSOR_HEIGHT表示lidar掛載的高度,-SNESOR_HEIGHT即表示水平地面。
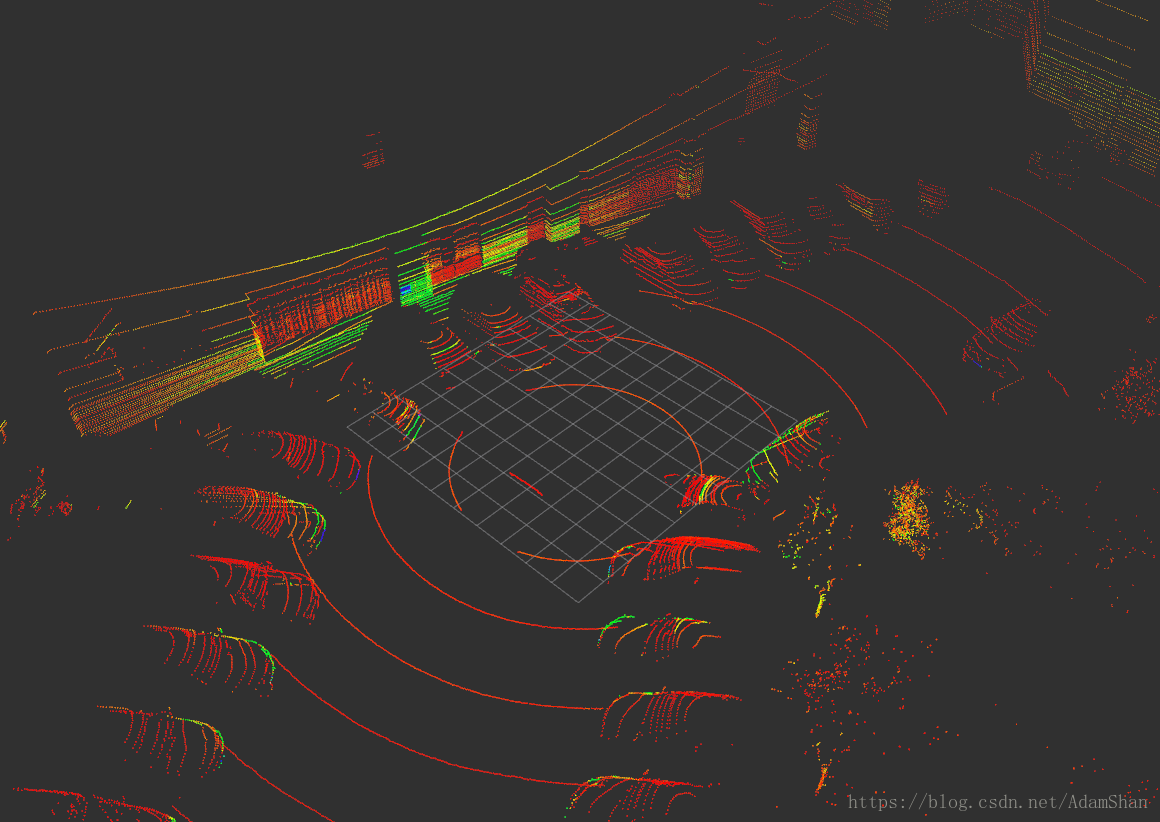
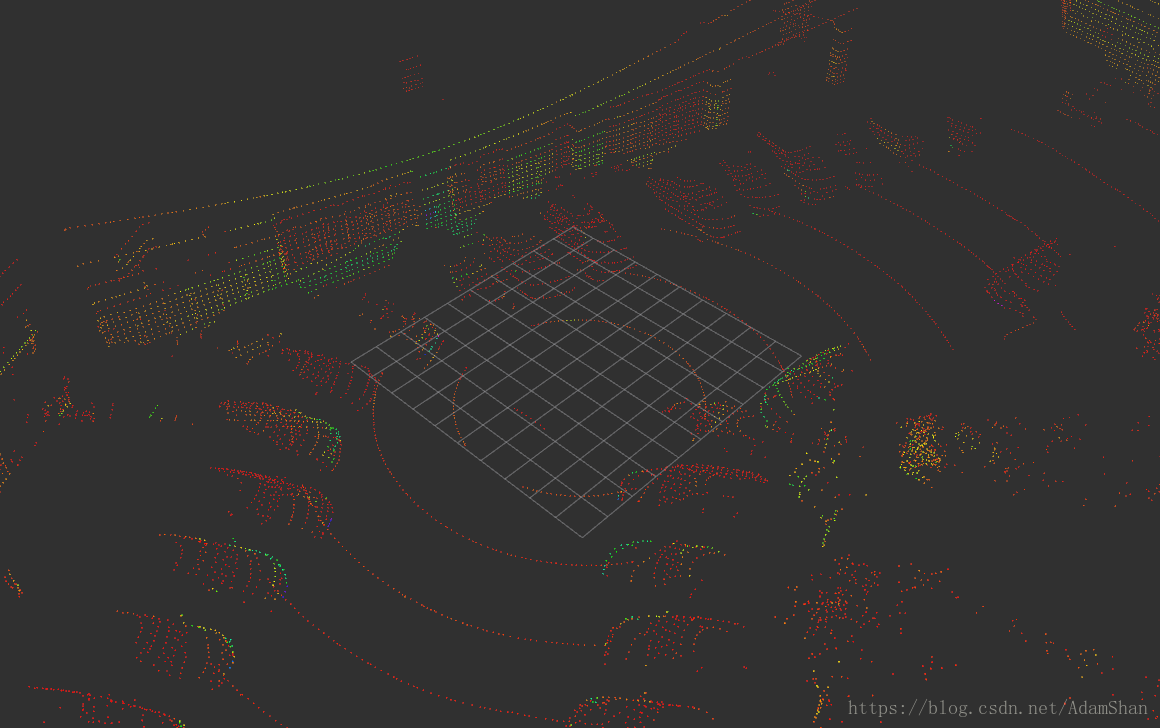
分割效果
我們使用上文中的bag來驗證地面分割節點的工作效果。執行bag並且執行我們的節點,開啟Rviz,載入兩個點雲display,效果如下所示:

其中,紅色的點為我們分割出來的地面,來自於 /filtered_points_ground 話題,白色的點為非地面,來自於 /filtered_points_no_ground 話題。分割出非地面點雲之後,我們就可以讓Lidar Detection的程式碼工作在這個點雲上了,從而排除了地面對於Lidar聚類以及Detection的影響。